Friday, April 29, 2016

Eat In Like Take Out! Slow Cooker Mu Shu Pork


Mu Shu pork is one of my very favorite Chinese restaurant dishes. I am the only one in the family who really loves this dish, so I don't often get to enjoy it. Today I want to share an amazing and simple Mu Shu pork that you can make right at home in your slow cooker!


Traditionally Mu Shu pork, when served in a Chinese restaurant, comes with rice pancakes, hoisin sauce and a variety of fresh vegetables. In some places you get everything stir fried together and it is served with rice or noodles. Mine is a little different but just as delicious! You are going to love how quickly it comes together and your family is going to love how wonderful this tastes!


I start with a bag of coleslaw mix, this makes life easy! If you want to shred your own, you
will need about four cups of white cabbage. I also added additional red cabbage and shredded carrots to the slow cooker. These vegetables will help to build the sturdy sauce that the meat will cook in low and slow. 

Flavorings are simple and you can grab them from the Asian section of just about any supermarket. I used some fresh ginger that I diced rather fine as well as whole garlic cloves that I sliced super thin. Not as thin as Pauley would have in the movie "Goodfellas" but thin enough nonetheless. I seasoned the meat with a mixture of salt, white pepper, garlic powder and onion powder and after I nestled the meat into the veggies I poured over an entire bottle of hoisin sauce as well as a bit of soy sauce. 

My favorite bottled hoisin is the "Soy Vey" brand Hoisin Garlic Sauce. The best hands down. I also love their Teriyaki sauce when I want to grab some for a quick fix and I don't have time to make my own.


Once everything is in the pot, just pop the lid on and set the slow cooker and let this cook on low for 6 to 8 hours or on high for 4 to 6 hours. or until the pork is cooked through and tender enough to shred with very little effort.

When the meat has reached that magic point and the veggies have broken down into a bit of a loose sauce, you will want to thicken things up a bit to give the dish that classic thick and glossy look and texture. I used a bit of corn starch and water slurry to achieve this. Once you add this to the simmering pot, the sauce will immediately begin to thicken and get glossy and beautiful. Now you are ready to serve!


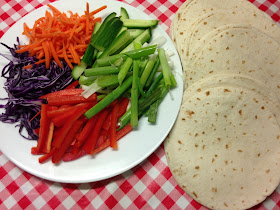
Traditionally, when you order Mu Shu pork you would get little rice pancakes to eat the meat and veggies with. I have used small flour tortillas that I warmed so they would be plyable. I serve the seasoned meat and sauce with a variety of fresh veggies like more fresh cabbage, carrots, green onions, red bell pepper and Persian cucumbers cut into thin strips. This can also be served as a lettuce wrap with cups of butter lettuce instead of the tortilla.


Now you can simply let everyone serve themselves and built their wraps or even a Mu Shu rice bowl! Layer the meat with the rice and add fresh crunchy toppings for an awesome supper or lunch during the work week!


This Mu Shu pork is simple to throw together and it makes your kitchen smell amazing! The flavor does not disappoint and you will have plenty left for another meal or two depending on the size of your family! This is even better leftover because the flavors have time to meld. 

You can store the leftovers for this dish in an airtight container in the fridge for up to one week or you can freezer bank the leftovers for another meal down the road. This will keep in the freezer for up to three months! This is one of my favorite ways to freezer bank! Leftovers that you don't have to think about!

I hope you give this slow cooker mu shu pork a try and I hope you love it!

Happy Eating!

Here is what you will need to make Slow Cooker Mu Shu Pork:

2 to 3 pounds pork tenderloin
4 cups shredded white cabbage
1 cup shredded red cabbage
1 cup shredded carrots
1 medium onion, sliced thin
2 tablespoons fresh ginger, finely minced
4 cloves garlic, sliced thin
1/4 cup soy sauce
1, 16 ounce bottle Hoisin sauce
1 teaspoon onion powder
1 teaspoon garlic powder
1 teaspoon salt
1 teaspoon white pepper
2 tablespoons corn starch
1 cup water

Step by Step Instructions

Place cabbage, carrots, onions, garlic, and ginger in the bottom of the slow cooker vessel.

Mix the dry seasonings together and coat the outside of the pork tenderloin.

Place the tenderloins on top of the vegetables.

Pour over the Hoisin sauce and soy sauce

Cover and cook for 4 hour on high or 6 hours on low or until the pork is very tender and shreds easily.

Shred the pork well using tongs.

Mix corn starch and water and pour into the slow cooker.  Mix well until the mixture begins to thicken slightly and becomes glossy.

You can serve at this point on place your slow cooker on warm until ready to eat.

Serve with small flour tortillas or butter lettuce as a wrap or over steamed rice as a rice bowl.

I offer toppings of shredded cabbage, carrots, thin strips of bell pepper, green onion and thin strips of Persian cucumber. 

Leftovers can be kept in an airtight container in the refrigerator for up to a week on in the freezer for up to three months.


See how I made this in my YouTube video:


Monday, April 25, 2016

Spice is Nice! Homemade Chili Lime Seasoning


I recently made a delicious mango and avocado salad with strawberries and in that salad I used my homemade chili and lime seasoning to take it over the top. I asked you if you wanted to see how it is made and the response was overwhelming! Of course you wanted to see it made! So today I am going to share with you this very simple yet delicious three ingredient chili and lime seasoning!


This is very similar to a popular Latin seasoning that you can usually find in the produce section called Tajin. It is a chili and lime seasoning that is popular in some areas. I see this a lot when the mangoes come into season in the spring and in the fall. Growing up in Arizona I remember this seasoning being used on all kinds of fruit as well as on, believe it or not, fruit pops! Some people love the sweet and savory mixture of flavors together.


My seasoning consists of three simple ingredients. Salt, chili powder and lime crystals. I have used my favorite, every day salt, pink Himalayan salt along with a basic chili powder and my favorite new find, True Lime, lime juice crystals! The "True" juice powders come in lemon, lime, orange and grapefruit and I love them. I purchased a little bit of everything from their website and I have to tell you that these are awesome. I am using these juice crystals in so many recipes and I have even used them in some homemade cleaning spray! 


I just used equal parts of the three ingredients, in my case 1 tablespoon of each and put them into a jelly jar. I screwed the lid on tight and gave it a good shake to distribute everything evenly. That's it! Super simple and super delicious. This seasoning is a great way to add some zing to just about any salad or soup that you can think of. I would use this as I would salt or pepper to add a special something to fruit or veggie salads or even an egg or potato salad would benefit from this chili and lime seasoning!

You can make as much or as little as you like. If you make a big batch you can share and give as gifts to family and friends! This is a great addition to a holiday gift basket or theme gift for the holidays, birthdays or anytime!

If you would like more information on True Lemon or Lime products you can find them on their website here: http://bit.ly/Truelemon

If you would like to see the salad I made using this seasoning, you can find it here: http://bit.ly/1SlqBjA

I hope you give this simple three ingredient chili and lime seasoning a try and I hope you love it!

Happy Eating!

Get the recipe here:
http://bit.ly/1rdGCl8

You can see how I made this in my YouTube Video!


Friday, April 22, 2016

Strawberry Lime Slush! Sipping Towards Summer! Torani Friday


Today I am making an awesome strawberry lime slush for Torani Friday!  Super easy to make and super delicious!  I have use Torani strawberry syrup and Torani lime syrup along with fresh strawberries and fresh lime.  In this case I put an entire lime wedge in, peel and all, to really get that lime flavor in the slush.


My goal here is to mimick the strawberry and lime slushy at Sonic and I came so close that I made it better!  The secret is the fresh fruit.  Instead of ice cream topping, the fresh berries and the fresh lime really take this to the next level as far as flavor goes.  

I have used my Nutri Ninja blender to make this but you can use any drink blender or a regular blender, I will say though, if you are using regular ice cubes, you should crush them first to make the process of the "slushing" easier.  If your fridge has a crushed ice option, then use that.  If not, simply crush your ice first.


Add the syrups to the crushed ice as well as the fresh fruit then top it all of with club soda or sparkling water or lemon lime soda.  Whatever is your choice, just make sure to pour enough water to come to the same level as the amount of crushed ice you have.


Blend until everything is nice and slushy, this will only take a few seconds.  Then pour into a serving glass or just pop a straw in the blender cup and enjoy!  I like to add more sliced lime and a fresh strawberry garnish if I am feeling fancy!

Don't limit yourself to strawberry and lime!  You can make slushes of any flavor you like!  You can even use whipping cream and vanilla and caramel syrup to make a creamy version of this slush.  Let your imagination be your guide and your collection of Torani is your only limitation!

I hope you give this strawberry lime slush a try and I hope you love it!

You can find Torani syrups on their website!
http://bit.ly/ToraniHome

You can see how I made this in my YouTube Video!


Happy sipping!

Business Inquiries can be sent to:
info@noreenskitchen.com

Sign up for my weekly newsletter and get exclusive recipes, video tutorials and articles!
http://eepurl.com/TZCV5

Don't forget to subscribe!  New videos Every Monday, Wednesday, Friday and Sunday!
http://bit.ly/17JVMTP

Subscribe to Rick's Tips Channel for Home Improvement and DIY Tips!  New videos every Saturday!
http://bit.ly/1ixCK8W

Check me out on social media!

Facebook:    http://on.fb.me/12bdibt

Twitter:         @noreenskitchen

Instagram:    http://bit.ly/12bdqrp

Google +         http://bit.ly/1o5GMYy

Read my Blog:   http://bit.ly/15R5GvV

***MAILING ADDRESS****
Noreen's Kitchen
PO Box 14173
New Bern, NC 28561

Have a question for me?  Send me an email:
info@noreenskitchen.com

Noreen's Kitchen Community Guidelines (The Rules)
http://bit.ly/1gZcwJF

Wednesday, April 20, 2016

Summer in a Bowl! Avocado, Mango Salad with Strawberries!


Today I want to share a delicious salad that I have been enjoying for a couple of weeks now for my lunch. This avocado mango salad with strawberries, hits all the notes, is super satisfying and will keep you coming back for more. I think you are going to love it!

This salad screams summer! It has all the freshness that you look for in a summer lunch. It smells amazing when you are making it and it looks amazing when you get it all in the bowl together. This one is a knock out the ballpark winner! I personally love a salad that has not greens in it from time to time. I love to have a chopped salad that has lots of veggies and fruits mixed together and this one is the perfect combination.

I know what you are thinking! Mango AND avocado AND strawberries AND onions? Really? Yes Really! Trust me on this one. This hits all those flavor notes you are looking for. Sweetness from the berries, tang from the mango, rich creaminess from the avocado and spicy bite from the onion. Lime juice brings the whole thing together with a palate cleansing citrus burst and married with a little bit of agave nectar to enhance the natural sweetness of the berries and the mango this is a real winner. Top this all off with a sprinkling of homemade chili lime seasoning and you have one out of this world experience in your bowl for lunch or dinner!

Like I said, I have been enjoying this for lunch the last couple of weeks. Normally I only eat two meals a day so Rick and I either enjoy breakfast and dinner or brunch and dinner. This is the perfect afternoon offering. i have been pairing this with a hard boiled egg on the side and this takes me to dinner with no problem. This is light but filling and it will stay with you and give you what you need to get the job done.

This salad is enough for two people as a side dish to a nice piece of grilled chicken or you can even serve this on top of the grilled chicken or a nice filet of grilled or broiled fish! This salad has amazing potential. Make it fresh when you want to enjoy this because it won't keep very well past a day or so because the avocado may get to mushy and disappear if it is ever so slightly too ripe. So you will want to keep that in mind.

If you don't have access to fresh strawberries or they are not in season, you could use blueberries, blackberries or even cubed nectarine, plum or peaches would be great. You can basically make this work with so many different fruits! Don't have sweet onion? Use red onion or green onion to round it out. Don't like onion? Skip it! Make this salad your own and enjoy!


I used a homemade chili lime seasoning on my salad. If you would like to see it, stay tuned because I will be sharing that in an upcoming video! I know you are just going to love that seasoning because it is so versatile in so many different dishes! Keep an eye out for that coming soon!

I think this is the perfect summer salad. I hope you do too! I know that when you give this a try you are going to keep on making it all summer long!


I hope you give this salad a try and I hope you love it! 

Happy Eating!

Get the recipe on my website here:

You can see how I made this in my YouTube video:


Tuesday, April 19, 2016

Homemade Sloppy Joes, An All American Favorite!

Sloppy Joe's are an American favorite and in our house that is no exception.  Hands down this is probably one of Rick's all time favorite dinners.  He goes to great lengths to get this for dinner on a regular basis.  It is usually his go to birthday meal.  

Many of us grew up with a popular canned version of the sloppy Joe sauce and my mom made that a few times, but then she started making it from scratch and I have to tell you.  If you are going to eat a sloppy Joe (incidentally not one of my all time faves), this is the one you want to eat!  My mom makes hers a bit different, but mine is the one Rick and the girls love.  Full of ground beef goodness, onions, bell pepper, celery and mushrooms.  Yes, I put mushrooms in mine, but you can leave them out if they are not your jam.    Then I build a sauce from condiments you already have!  Ketchup, mustard, brown sugar, Worcestershire and then I toss in a small can of diced tomatoes and green chilies, otherwise known as Ro-Tel, for good measure.  Don't forget some spices to round everything out!  Garlic powder, onion powder, salt, pepper and paprika will give this the over the top flavor you will fall in love with.


This get simmered over low heat for about 15 to 20 minutes and then load into some warm hamburger buns and you are off to the races!  Leftovers are even better because these flavors just meld and marry into an amazing taste sensation.  I have even seen Rick eat this warmed up with just a spoon like a bowl of chili!  Yes, it's that good!


Leftovers are easily saved in the fridge in an airtight container.  These should be eaten inside of a week.  If you want to make a big batch you can portion this out in containers and freeze for easy meals later on.  This will keep frozen for up to three months, so bulk cooking this is an excellent idea. To reheat, you can thaw on the counter during the day or in the fridge overnight or you can do what I like to do and place the frozen sloppy Joe "brick" in the slow cooker on low and let it simmer during the day and you are good to go for dinner, just add buns and a salad an voila!  Dinner is served!


The history of the Sloppy joe is a bit murky but there are several theories of how it came to be.  In the 1920's the loose meat sandwich was created in a small Iowa restaurant by a man named Floyd Angell this was nothing more than cooked ground beef in a loose sauce with spices served on white, sliced bread.   In the 1930's and throughout, the addition of ketchup and other seasonings and vegetables is seen in many recipes.  During World War 2, rationing was in place.  Meat was a scarcity, so the Sloppy Joe was on many a table since it could be made with little meat and stretched with vegetables and even potatoes or rice to make sure everyone had enough.

The most likely source of the Sloppy Joe, however comes from a little place in the Florida Keys, incidentally called "Sloppy Joe's".  The name spread far and wide during the depression.  There were many restaurants with this name.  There is also a line of thinking that the name simply stems from the fact that a hobo like man named Joe, was seen eating this sandwich and the name of the dish stuck.  Like many an American tradition, we may never no the true origin of this delicious and flavorful family staple!

I hope that you will give these homemade Sloppy Joe's a try and I hope you love them!  

Happy Eating!

Get the recipe here:


See how I made these Sloppy Joe's in a somewhat vintage YouTube video on my channel

Monday, April 18, 2016

The Pressure Cooker Pantry Meal: Creamy Chicken and Rice! The Answer to Quick and Easy!


This quick creamy chicken and rice is a recipe I developed to come right off your pantry or food storage shelf. Using home canned or regular canned chicken, homemade cream of celery soup, some canned mushrooms from your pantry and a bit of seasoning and oil. This is made even faster by cooking it in the pressure cooker!

I thought it would be awesome to make a fast recipe even faster by employing my trusty pressure cooker and I did just that! The rice comes out so creamy using this method I think you will love it!

I have used one recipe or 4 cups of my homemade cream of celery soup along with 2 pints of my home canned chicken breast with the liquid, but you can use two large cans chunk white chicken from the store. You can sub out two cans of condensed cream of celery soup if that is what you have and two cans of milk or water. I prefer the milk here to give this a really creamy texture and flavor. I also added two small cans of sliced mushrooms along with their liquid and about a tablespoon of poultry seasoning and some oil. 

It is very important to remember the oil when cooking rice in the pressure cooker because skipping that step could lead to your pressure cooker pit cock/vent becoming clogged and ruined forever. Best to err on the side of caution and toss in the oil. I also use oil when cooking plain rice as well as dry beans in the pressure cooker for this same reason. 

I used the default "Rice" setting on my Elite 10 quart pressure cooker and set my creamy chicken and rice to cook for 12 minutes. I allowed the unit to rest after it had cooked for the complete amount of time and released the remaining pressure after about five minutes. 

The resulting creamy chicken and rice is amazing and delicious and the perfect meal to serve on a night when you are haggard and hungry. This comes together super fast for nights when you either forgot to thaw out some meat, are too tired to cook or are at a loss for what to make or all of the above. This one hits home in a big way! Make some steamed veggies and/or a salad to serve along with this and dinner is done. You will even have a few moments to decompress while this cooks. 

This may well become one of your "go to" dinner choices. It's so easy to just pull the items from your pantry shelf that you will want to have the ingredients on hand. If you are making this using homemade cream of celery soup, then you can always plan ahead and make this on the weekend and stow it in the fridge for the night you know you will make this and it's ready to go. In a pinch the canned condensed soup will work, but give the homemade version a try at least one time so you can see how amazing the flavor is! 

Busy families can never have to many new and different ideas for dinner. This is one that I am certain you will love. I mean whats not to love? chicken, rice, creamy sauce and you can even stir those veggies in at the end if you want a one dish meal! Simple and quick. I understand how tough some nights can be! This makes it easy and keeps you from spending precious dollars and time going out to eat or bringing home take out. 

I hope you will give this quick and easy pressure cooker creamy chicken and rice a try and I hope you love it! If you do try this, please let me know! Be sure to snap a picture and share with me on Facebook, Twitter, or Instagram! I love to see what you are doing in your kitchen!

Happy Eating!

You can get the recipe from my website:  http://bit.ly/1Tg1LUP

You can see how I made this here:


Wednesday, April 13, 2016

Ditch The Can! Make It Yourself! Cream of Celery Soup is Quick, Easy and Delicious!

Today I want to share another "cream of" soup in an effort to get all of us away from the highly processed, sodium filled, chemical laden offerings on the grocery story shelf.  In recent years, I have developed a serious aversion to these products.  They are often a go to item and many of us have memories of the myriad of casseroles, sauces and other recipes that included this ingredient.

I don't really know when it became easier to grab a can of cream of mushroom, celery, chicken or onion soup and pop it open and shake it's jiggly blob like form into a bowl to construct our chicken, tuna or green bean casseroles.  I mean, there are seriously very few ingredients involved in this deal that we have gobbled up by the gallon for years.  The problem is now, we are all a little older and a little wiser.  In my case, I want to teach my girls that making things from scratch is better.  It may take a few minutes longer, but with proper planning you get a much better, much healthier, much tastier end result.  Yes, it is convenient, but at what cost?  

So today I am planning on making a chicken and rice casserole in my pressure cooker so I need some cream of celery soup.  I happily share this with you today in hopes that you will also enjoy the simple, task of making this from scratch with simple ingredients that you may already have on hand.

Celery soup is amazing on it's own.  Paired with a simple salad and a biscuit, some crackers or even some toasted garlic bread, you would feel sated and satisfied with a bowl for lunch or supper.  This is also an elegant option for serving to guests as a first course.  Imagine how impressed your friends or family would be to have this placed in front of them to begin their evening meal at your table!  I guarantee they will talk about it for a long time and even ask you for the recipe!  This is also an awesome way to start many a casserole, dinner bake or side dish.  I would use this in my homemade tuna casserole, chicken and stuffing bake and the chicken and rice pressure cooker meal I am using it in tonight.

This recipe used the beurre manie' thickener that I shared in a recent video and blog entry.  you can find that video here: http://bit.ly/BeurreManie and the blog entry here: http://bit.ly/NoreensKitchenBlog.  Beurre Manie' is a great cold, thickener that is sort of a reverse roux and can be added to hot simmering liquids to thicken them.  This is a great thing to have on hand if you thicken a lot of sauces and


you can just drop it in and whisk until the dish reaches the desired thickness.  I make only what I need, but you can make it and store it in the fridge.

I sauteed some celery onion and garlic in a bit of butter, added some chicken stock and water and  a handful of spices, salt, pepper and celery seed.  I allowed this to simmer for five minutes and then thickened with the beurre manie'.  I removed the soup from the heat and added the cream and a couple grates of fresh nutmeg.  

Now don't get freaked out about the nutmeg.  This spice has a very citrusy, lemony edge to it.  Your soup will not taste like a cookie, I promise you.  It will however, leave a lovely floral, lemon note on the palate when you eat it and it will add just enough of that extra something special to your dish.

I would be done there.  If you are going to use this in a casserole, it's great or you can blend it smooth before serving.  Your choice!

I hope that you will give this a try and see how awesome and easy it is to make your own homemade cream of celery soup!  You won't go back to the can after this!

I hope you try it and I hope you love it!

Happy Eating!

Get the recipe here:  http://bit.ly/1qq5sxu


You can see how I made the soup in my video here:


Monday, April 11, 2016

Classic French Beurre Manié Easy To Make Thickener for Soups and Sauces! How to Feel Like Julia Child in Your Own Kitchen!

Today a kitchen basic that may or may not know!  Beurre Manié translated from the French directly means, kneaded butter.  This is sort of a reverse roux that can be used to thicken soups or stews easily and without having to add flour to a pan of sauteed' vegetables to make a pasty mess.

Using a Beurre Manié ensures that your sauce will come out smooth and luscious.  This is nothing more than softened butter that is blended or "kneaded" together with all purpose flour to make a paste.  Many classic recipes call for unsalted butter, however, I have used salted and you should use what you prefer when you make yours.  This is easily achieved on a flat plate with a fork.  Make sure your butter is nice and soft.  Mine was a bit on the melted side because my kitchen was particularly warm that day.  But no worries!  You can make this in advance if you require a thickener often for your dishes and you can store it for up to a month in the refrigerator in a jar or container with a tight fitting lid.

Use the Beurre Manié by adding it to simmering liquids for sauces or soups that you want thickened.  You can use a little or a lot depending on how thick you want your dish to be.  I made mine on this day to thicken a homemade cream of celery soup and it worked great! You just drop in pieces of the Beurre Manié little by little and whisk away until the flour has absorbed the liquid and thickened your sauce or soup.

The straight definition of this helpful blend is:  

Beurre manié (French "kneaded butter") is a dough, consisting of equal parts of soft butter and flour, used to thicken soups and sauces. By kneading the flour and butter together, the flour particles are coated in butter. When the beurre manié is whisked into a hot or warm liquid, the butter melts, releasing the flour particles without creating lumps.

Beurre manié should not be confused with roux, which is also a thickener made of equal parts of sometimes clarified butter or many other oils and flour, but which is cooked before use.[2]

Beurre manié is also used as a finishing step for sauces, imparting a smooth, shiny texture prior to service.

This is a very classic French technique that is super applicable in the home kitchen.  You may have been doing this because your mom or your grandmother did it and not even known that they teach this at the Cordon Bleu or that Julia Child was a fan of this type of thickener!

I hope you will give this Beurre Manié a try!  In the right application it is a great choice instead of sauteing your veggies in a skillet and then making a roux and adding them back to the pot.  Just saves a little time and effort on the clean up end and in my book that goes a long way!  

I hope you give this a try and I hope you love it!

Happy Eating!

See the video demonstration here:


Wednesday, April 6, 2016

Carolina Roast, My Answer to Mississippi Roast! A Pot Roast by Any Other Name is Still a Pot Roast!

The internet created a monster and it is called Mississippi Roast!  I have seen this done hither and yon a thousand different ways.  While I am sure it is delicious, I have issues with the original recipe.  Firstly, let's talk about the elephant in the pot that is the ENTIRE stick of butter placed on top of an already fatty  piece of chuck roast!  Then let's talk about the over the top sodium content of using a packet of either dry ranch or Italian dressing mix as well as a packet of beef au jus mix.   I can't even begin to fathom the amount of salt in that recipe.  Not to mention the fat on fat of butter and beef.    There are few times you will see me be concerned with a recipe, but with this one I have issues.

The only way to deal is to make your own recipe.  So I set forth to make my version of the Mississippi Roast.  I thought it would be a nice recipe to make in the pressure cooker.  I also thought that since they were using dressing mix as a seasoning base, why not just use dressing.  Since Ranch was not going to work in it's liquid form, I have opted to use my homemade Italian dressing http://bit.ly/ItalianDressing  that I made with my Homemade Italian seasoning blend http://bit.ly/Italianseasoning.  I added some beef stock and an onion and some chopped garlic along with a jar of pepperoncinis that I popped the seeds and stems out of.  I also used a bit of the vinegary juice from the peppers as well.

I pressure cooked this for a total of one hour.  In the video I mentioned that I started at 40 minutes, but I ended up needing to add a bit more time.  If you do this, start yours for an hour and save yourself the headache.  Slow cooking is an option and if you don't have a pressure cooker, you could easily do this in your slow cooker by cooking for at least 6 to 8 hours on low or 4 to 6 hours on high.  The result will be similar.  Pressure cooking is the pe

In the end this was a delicious roast.  You can serve it like I did with egg noodles and a veggie or you can shred this in the pot in it's juices along with those mild peppers and serve this piled into some soft Italian rolls.  Add some Giardinera and you are on your way to a Carolina Chicago beef fusion the likes of which you have never seen.

This delicious, briney, perfectly seasoned beef roast was delicious and we will make this again.  You could also do this with a pork loin if you like, but adjust the time to suit the size of your roast.   Dare I say, this Carolina Roast also has a bit of a tang to it, just like Carolina BBQ, so this fits right in down my way!

I hope you give this Carolina Roast a try and I hope you love it!  

Happy Eating!

You can watch my video here:


You can get the recipe here: