}]; Noreen's Kitchen: Summer
Showing posts with label Summer. Show all posts

Tuesday, July 19, 2016

A Taste of the Islands Right In Your Own Back Yard! Sweet & Spicy Caribbean Style BBQ Sauce


I am getting ready to make some jerk chicken on the grill and wanted to make it extra special by giving it a baste with some delicious BBQ sauce. If you are like me, you prefer to make your own when you can and this sauce is over the top delicious!

I made it my goal to replicate or at least come close to a jerk dipping sauce that a local restaurant serves and they wouldn't give me their recipe. Lucky for me I don't need one! I figured it out myself! I can make this anytime I want and slather it on chicken, pork, burgers or use it as a great dipping sauce or even a base for a sweet and spicy salad dressing! 

This sauce uses my basic BBQ sauce as a starting place. What makes this Caribbean is the spice blend. It is also what takes this over the top amazing! Ketchup, molasses, orange juice, apple cider vinegar, Worcestershire sauce, Habanero pepper sauce, garlic powder, onion powder, paprika, salt, pepper, allspice, cinnamon, nutmeg and clove all come together to make a sauce that you will just want to eat off a spoon it is that delicious!


We made some Jamaican Jerk chicken thighs for another video that will be coming up this week as a collaboration with the Common Man Cocktails channel. You will see that soon. We marinated our chicken in a wet Jerk marinade and then grilled on a very hot charcoal grill. Then we slathered on this sauce and let it come to a shellacked perfection. They were delicious and amazing and I cannot wait for you to see how they came together. 


I knew I had to share this sauce with you though, because I know you would want to know. You really need to make this sauce! Since I made it, we have used it to dip chicken in, on pork chops, on fries and I even put it on a burger and it was amazing!

I hope you will give this sweet and spicy Caribbean style BBQ sauce a try and I hope you love it!

Happy Eating!

You can see how I made this in my YouTube video here:


Noreen's Kitchen
Sweet & Spicy Caribbean Style
BBQ Sauce

Ingredients

2 cups ketchup
1 cup dark brown sugar
1/2 cup molasses
1/2 cup orange juice
1/4 cup lime juice
1/2 cup apple cider vinegar
2 tablespoons Worcestershire sauce
1 tablespoon paprika
1 teaspoon garlic powder

1 teaspoon onion powder
1 teaspoon ground ginger
1 teaspoon ground allspice
1/2 teaspoon ground cinnamon
1/4 teaspoon ground clove
1/4 teaspoon ground nutmeg
1 teaspoon hot sauce
1 teaspoon salt
1 teaspoon cracked black pepper

Step by Step Instructions

Combine ingredients in a saucepan.

Stir well to combine.

Allow to come to a simmer over medium heat stirring occasionally to avoid scorching.

Remove from heat and allow to cool.

Store in a jar in the refrigerator for up to 1 month.


ENJOY!

Wednesday, June 29, 2016

Fresh and Fabulous! Fire Roasted Green Chili and Onion Salsa Verde Recipe!!


Let's put some of those fresh, fire roasted green chlies to work for our dinner shall we?  This recipe for fire roasted green chili and onion salsa verde is delicious and super simple!  This goes together in no time and if you already took the time to roast your chilies, then this is doubly easy!

I used about six of the fire roasted chilies for this batch of salsa verde.  I put the chilies along with 1 sweet onion that I sliced and charred on the grill in the blender.  I added 2 or 3 cloves of garlic, a good handful or about 1/2 cup packed of fresh cilantro and a 2 tablespoons to 1/4 cup of lime juice and a teaspoon of salt.  You don't want to leave the salt out here or it will be very bland.

Blend that smooth.  Taste for seasoning.  You can add whatever you like here.  Cumin, lime powder and zest would be great or some oregano and even a pinch of chipotle or cayanne pepper would be nice depending on your heat tolerance.  


I took two additional peppers and one thick slice of charred onion and chopped them roughly.  I added them to the blended salsa and stirred well.  This will give some body and toothsomeness to the salsa and it will also give you a good hearty bite when you dip your chip in there.

You can use this to serve with chips, spoon over a burger or make some wicked chicken salsa verde or even green chili stew.  This is a great base as a cooking sauce for a slow cooker meal or even a quick green chili enchilada at the end of a long day.  I even like this spooned over scrambled eggs.  Divine!

You can also do this with canned, whole green chilies if you can find them, but that will not give you the delicious smoky flavor that you get from the fire roasting.  


So there is something amazing you can do with those roasted chilies we made.  I plan on spooning this over my green chili burger very soon.  I also plan on using this on some eggs for breakfast!  No matter what you use it for, you are not going to want to be without it once you give it a try!

So, as always, I hope you try this and I hope you love it!

Happy Eating!

Noreen's Kitchen
Fire Roasted Green Chili & Onion
Salsa Verde

Ingredients

6 anaheim chilies, fire roasted and peeled
1 large sweet onion, sliced and charred
1/4 cup lime juice
3 cloves garlic, minced
1/2 cup packed, fresh cilantro
1 teaspoon salt

Step by Step Instructions

Place 4 chilies and all but one slice of onion along with cilantro, garlic, lime juice and salt into the cup of a high powered blender or food processor. 

Process until pureed consistency.

Pour into a bowl and set aside.

Chop remaining green chili and slice of onion roughly.

Add chopped chilies and onion to the bowl of puree and stir well.

Taste for seasoning.

You can spice this up any way you like.  Add cumin, oregano, cayenne or even some chipotle powder for a kick.

Enjoy as a cooking sauce or served as a dip or spooned over a burger or in a taco or even over scrambled eggs.


Enjoy!

You can get a printable copy of this recipe here:  http://bit.ly/29rbV4p

You can see how I made this in my YouTube video:


Monday, May 9, 2016

Pick Your Produce! How to Pick the Perfect Avocado!


Today we begin a new intermittent series called "Pick Your Produce".  In this series we hope to help you understand how to best pick particular produce that may be baffling you or maybe you just never understood how to choose the best one of something or other.  Today we begin with avocados!

Avocados are often associated with Mexican food and are best known as the main ingredient in Guacamole.  It is the fruit, actually it is botanically a large berry, of the avocado tree which is native to Mexico.    The avocado tree has a long history of cultivation in central and south America and there is some evidence that this history may go back as far as 5000 B.C.!  There are many varieties of the avocado, including heritage varieties.  In America the most popular variety hails from California and is widely known by the "Haas" name.  Avocados are grown the world over in tropical and sub tropical climates.

Picking the perfect avocado is easy, if you know what you are looking for and just like with everything else, there is a learning curve.  This isn't rocket science, but there are a couple of tips and trick to help you on your way to getting the best avocado you can for your meal. 


First you have to decide if you are going to want to eat the fruit immediately or if you are going to wait a day or two.  This will determine the ripeness of the fruit you choose.  Pick avocados that are heavy for their size, they should fit in the palm of your hand.  If they are on the bright green side, this is an indication that it is not fully ripe and when you give it a gentle squeeze with your finger, and it feels heard and does not yield easily to that pressure, your avocado is not good for eating today, but it will be in a day or two. 

If you want to eat your avocado today, then look for fruits that are greenish black to black in color and again, hold in the palm of your hand and apply gentle pressure.  If the flesh yields and leave a bit of a dent then you are good to go.  If you hold the fruit and it feels mushy like a water balloon, then leave it, that one is not fit for anything but the compost. 

To ripen an avocado you can simply leave it on your counter and wait a couple of days or some people like to put them in a paper bag with either an apple or a banana and close it up and the next day they should be ready to eat.

When your avocado is ripe you can cut it around the middle and give it a gentle twist and it should separate from the pit easily.  If you are only going to eat half, eat the half without the pit.  Leave the pit in the other half and put it in a plastic bag or sealed container with a squeeze of lemon or lime juice.  Leaving the pit in the other half will help it to retain its freshness.  At least that is my personal experience.  Store any ripe avocados in the fridge till you are ready to use them.  Don't buy more than you can eat in a few days.

Avocados are a love it or hate it type of fruit.  In our house we have two who LOVE them one who HATES them and one who can take them or leave them.  I could personally eat avocados all day long.  The are often seen on the side of a sandwich, or in a salad or on some hearty toast for breakfast.  They are also known to be thrown into a smoothie every now and then to add rich creaminess without adding dairy.


Avocados are nutrient dense super food that everyone can benefit from enjoying.  They are the only food to naturally contain good monounsaturated fats.  That is good fat for you and I!   They are naturally cholesterol and sodium free! Nutrient dense avocados provide a substantial amount of vitamins, minerals and other nutrients with relatively few calories. One-fifth of a medium avocado has 50 calories and contributes nearly 20 vitamins and minerals, making it a great nutrient dense food choice.  Avocados act as a “nutrient booster” by helping  to increase absorption of fat-soluble nutrients like Vitamins A, D, K and E.  So in short avocados are awesome for your health!  Avocados are also an excellent "first food" for baby!  The smooth creamy texture is something that most little ones will enjoy and with all the nutritional benefits contained in that little green fruit, how can you go wrong! 


So I hope this is helpful information about how to pick the perfect avocado for you to enjoy today tomorrow or the day after!  I hope that you will use it well and enjoy avocados more often!  While they are available most of the year, the spring/summer season is the time they are most plentiful and at their peak of deliciousness.  So that is how you pick your produce in avocados! 

I hope you give this method a try and I hope you love it!

Happy Eating!


You can see my demonstration of how to choose a great avocado in my YouTube video here:


Wednesday, May 4, 2016

A Sprinkle of Tuscany! Salt Free Lemon Pepper and Herb Seasoning!


Spring is well underway and summer is coming.  Anyone who knows me, knows that this is NOT my favorite time of year.  I basically get through summer in anticipation of autumn!  There are redeeming qualities about summer.  Gardening and fresh, home grown vegetables, trips to the local farmer's market for locally grown produce.  Canning season is always something I look forward to and strawberry jam is on the list for this year.  A few trips to Busch Gardens and maybe the beach.  Lastly grilling is something I always look to during the summer.  Yes we grill most of the year, but let's face it, summer is when you grill.  It just is!

That is my line of thinking with this new seasoning mix I have come up with.  This salt free lemon pepper and herb blend is the best of a couple of worlds.  Firstly this is lemon pepper so yeah, there's that.  Second this is kind of like an Italian seasoning, only mixed with lemon pepper seasoning so you kind of end up with an amazing Tuscan lemony, peppery, Italian explosion in your mouth when you use this blend.  The third benefit of making your own blend is that you can control what goes into this.  Have you ever turned over the bottle of lemon pepper to see what is really in there?  A couple of the varieties I researched actually have NO lemon at all!  Only citric acid to give it a tangy edge to fool your brain into thinking that there is lemon in that thar bottle!  Some had MSG mixed in others had lemon oil and canola oil and most had salt as the main ingredient.  The salt free versions had dried lemon peel and of course, no salt and other things.  When an ingredient list ends with "natural flavors and spices"  I get a little freaked out because that could mean a lot of things!


So making our own is a total option here.  I have used a lot of different things to give this an amazing citrusy boost  Including granulated lemon peel that I get from The Spice Barn website.  This is a much better value than those little bottles on the grocer's shelf and you can use this for a lot of things.  I have also added some True Lemon crystallized lemon juice to give this an amazing lemon flavor and tang.  There is no need for citric acid because this dried lemon juice is amazing and will make you fall in love with the lemony taste it can give anything!  I will leave links to both of these sites below in the resources listing.

I have used a peppercorn blend that includes black, white, pink and green peppercorns.  Sometimes the blends also have coriander and allspice in them as well. I love this blend, but if you just have black peppercorns, go for that!  use what you have!  I added onion, garlic, parsley, red pepper flakes, basil, thyme, and oregano to make this blend pure perfection.  This screams Tuscan summer to me.  I have never been to Italy, but I can imagine and in my mind I can just see the lemon trees and olive groves and the beautiful Tuscan sunrise greeting me in the morning!  Ok, ok, enough daydreaming!  Back to business.


I just toss all this into my mini food processor or coffee mill and grind this up.  Not super fine, though.  We are not going for powdered or pulverized.  I think the beauty of this blend is the course grind.  Perfect for a grilled ribeye steak with chunky pieces of peppercorn on the top that get just a little charred when grilled just right!  After this is blended just pour into a mason jar with a tight fitting lid and you are good to go the next time you grill.


I would use this on just about anything savory.  Sprinkle on beef, chicken pork or fish.  Mix with olive oil and balsamic vinegar for a salad dressing or quick marinade.  Sprinkle over steamed veggies and dress with olive oil and fresh lemon juice.  You can even dress freshly popped popcorn with olive oil and salt and sprinkle a wee bit of this seasoning on top with some parmesan cheese for an amazing tangy Tuscan popcorn for movie night!  How does that sound?

I hope you give this salt free lemon pepper and herb seasoning blend a try and I hope you love it!


Happy Eating!


Noreen's Kitchen
Salt Free Lemon & Herb Blend

Ingredients

4 tablespoons peppercorn blend
4 tablespoons dried lemon peel granules
4 tablespoons dried parsley flakes
2 tablespoons dried, minced garlic
2 tablespoons dried, minced onion
2 tablespoons lemon juice crystals (Truelemon)
2 tablespoons dried oregano
2 tablespoons dried basil
1 tablespoon dried thyme
1 tablespoon ground celery seed
1 teaspoon red pepper flake (optional)

Step by Step Instructions

Combine all ingredients in the bowl of your food processor, mini food processor or coffee grinder.

Pulse to blend to a coarse grind.  You don't want this powdered.

Place in a mason jar or airtight container with a tight fitting lid. 

Store in a cool, dry place for up to 6 months.

This is great to season steak, chicken, fish or pork.  Used as a seasoning for salad dressing or marinade or sprinkled over fresh steamed veggies with a spritz of fresh lemon juice. 

Get a printable version of this recipe here:
 http://bit.ly/1TnT8EM


Get lemon peel granules at The Spice Barn

Get True Lemon products on their website:

Business Inquiries can be sent to:
info@noreenskitchen.com

Sign up for my weekly newsletter and get exclusive recipes, video tutorials and articles!

Don't forget to subscribe!  New videos Every Monday, Wednesday, Friday and Sunday!

Check me out on social media!

Facebook:    http://on.fb.me/12bdibt

Twitter:         @noreenskitchen

Instagram:    http://bit.ly/12bdqrp

Google +      http://bit.ly/1o5GMYy


Monday, May 2, 2016

A Taste of the Keys! Key Lime Pound Cake! The Perfect Summer Dessert!


Spring has arrived for many of us, even if I did see my friends in Flagstaff, AZ receiving snow and below freezing temperatures on May 1st!  UGH!  Today I wanted to share with you a recipe for a delicious key lime pound cake that is sure to chase the winter doldrums and put you in the mood for a tropical holiday! 

This pound cake is sweet, but not too sweet, it is tangy and refreshing and perfect!  I am a pound cake fan!  An aficionado, if you will.  We love it plain and with flavor.  My grandmother made a five flavor pound cake that was to die for!  This one is a close second!  This key lime pound cake is just delicious.  A few weeks ago, a friend from church tagged me in a post on Facebook for a recipe for a key lime pound cake with a cream cheese frosting.  She told me how good that it looked and suggested that I be the one to make it for an upcoming potluck supper at church.  So how could I refuse?  She would love it and so would everyone else.  However I did not use the recipe from the post.   I used my own pound cake recipe and I boosted the flavor by making this a key lime pound cake.


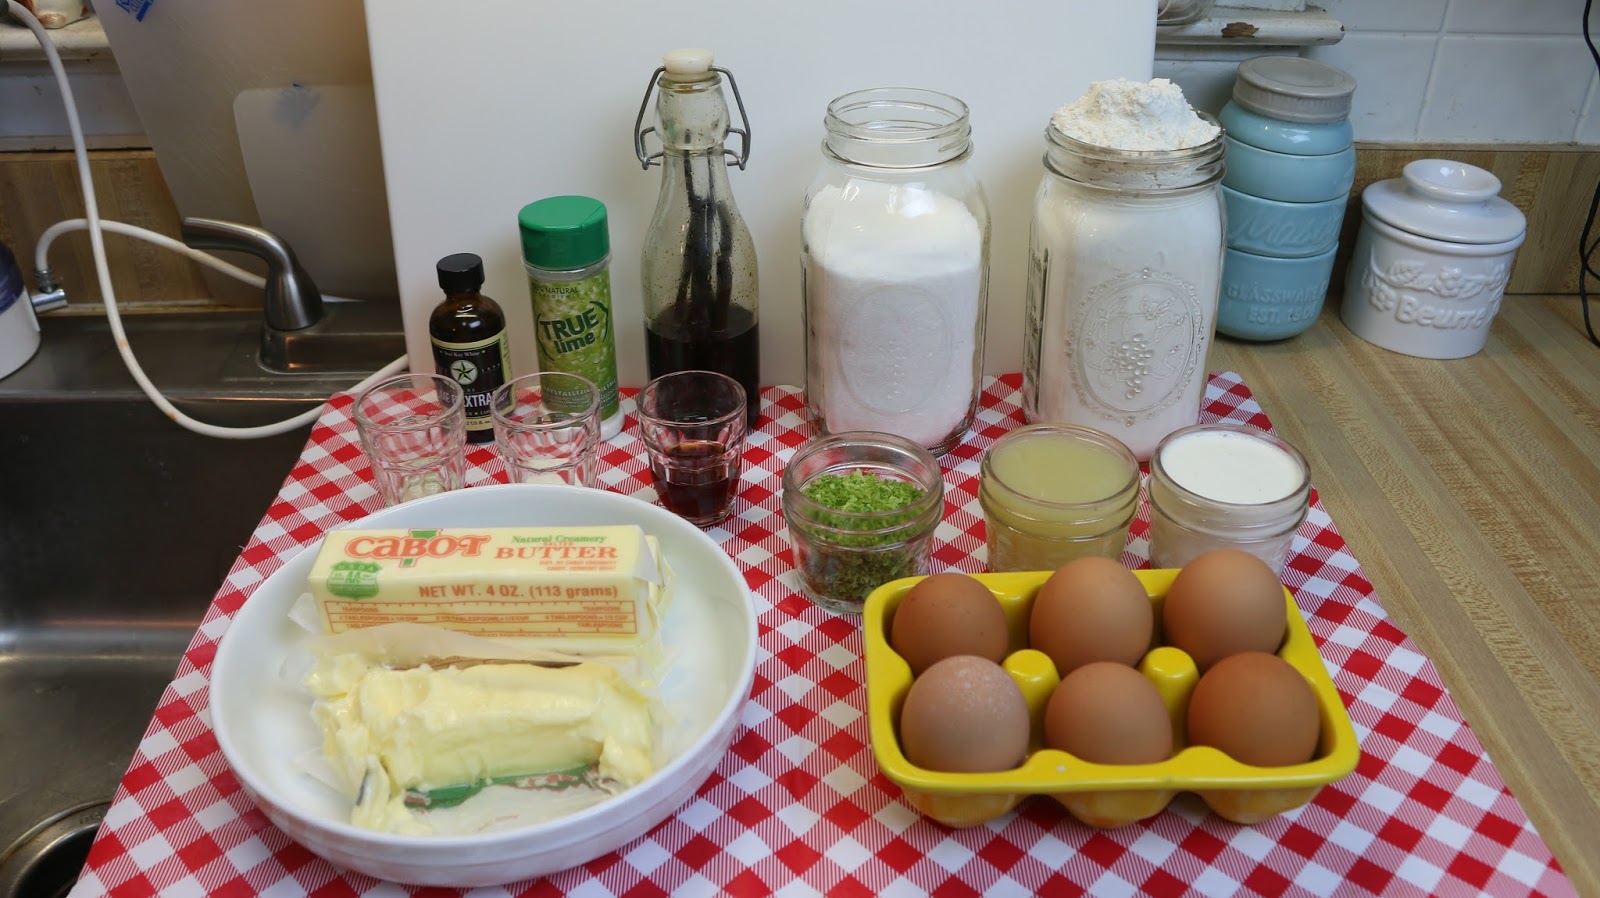
Like all good pound cakes this one starts with an entire pound of butter!  Yes, an entire pound.  Remember, this makes a large cake or two standard size loaves of pound cake, so this is going to serve a lot of people.  In all, this should serve between 24 and 30.  You don’t need a large slice to be satisfied.  This is rich and buttery and delicious.  Be sure to use good quality butter and not margarine which is nothing more than whipped oil and will give you a very disappointing, substandard outcome.  So use the butter you will be glad you did.  I prefer to use locally produced roll butter if I can find it, but I also love Cabot Cooperative Creamery butter.  That is the one that I regularly reach for in the grocer's case. 

Eggs, flour, milk and sugar round out the basics and then the flavorizers to boost this cake and make it an amazing tropical, treat reminiscent of a vacation in the keys and a reminder of what Papa himself, Earnest Hemingway may have once enjoyed on a balmy, breezy afternoon on the veranda while writing one of his classic novels.  A bit much?  Maybe, but who cares?  Key limes are very small and sometimes hard to come by so I usually use Nellie and Joe's Famous Key West Lime Juice.  Since you need a half a cup for the cake and over a quarter cup for the glaze, that is a lot of tiny little limes to squeeze.  So use the juice in the bottle.  It is really good quality.  I have it on hand all the time.  However, you will still need to use fresh limes to grate 4 tablespoons of zest for the cake and an additional two for the topping.  So about six limes will give you that amount.  You can use the limes for other things like your tea or your gin an tonic if you are so inclined.  They won't go to waste!  I have also used vanilla extract as well as lime extract and lime crystals.  If do not have or cannot find the latter two items, don't sweat it, your cake will be delicious with or without.  The extract and the True Lime powder simply boost the lime flavor and tang of this cake and take it over the top!


I have used a mixer to make the batter, you should be sure to take the time to cream the butter and the sugar until they have become nearly white in color and light and fluffy.  Then add the eggs one at a time and the flavorings and then alternately the flour and milk.  You always want to end with the flour.  Be careful not to over mix and not to whip any additional air into the batter once the flour and milk have been added.  You want your pound cake to be dense not full of air. 

This cake goes in for a long slow bake.  I have used a tube pan.  You can use that or a bundt pan or two standard loaf pans 9 x 5 inches.  The tube or bundt pan bake at 300 degrees for 1 hour and 40 minutes while the loaves take just 1 hour and 15 minutes.  You will want to do the toothpick test to be sure that they are done properly.  Remember, no moisture on the pick or it goes back to finish for a few minutes longer.  Remove the cake and allow it to cool in the pan for about 10 minutes, then turn out onto a rack to cool completely.

When cooled, simply make up your glaze, drizzle on top and sprinkle with the remaining lime zest.  Voila!  A beautiful tropical treat perfect for any summer gathering or celebration!

This is delicious on it's own but dare I say, topped with a dollop of homemade whipped cream will really take this memorable cake over the top!  I promise people will be asking for the recipe!

I hope that you will give this key lime pound cake a try some time soon and I hope you love it! 

Happy Eating!


 Key Lime Pound Cake


Ingredients
4 sticks (1 pound) real butter, softened
    Do not use margarine!!
3 cups granulated sugar
6 eggs at room temperature
2 teaspoons vanilla extract
1 teaspoon lime extract (optional)
4 cups all purpose flour (not self rising)
1/2 cup key lime juice
4 tablespoons fresh lime zest
1 teaspoon lime juice crystals (optional)
1/4 cup milk
1/4 cup heavy cream

Glaze
2 cups confectioners (powdered) sugar
5 tablespoons key lime juice
2 tablespoons fresh lime zest for topping


Step by Step Instructions

Preheat oven to 300 degrees.

Beat butter with mixer until light and fluffy.

Add sugar to butter and cream together until light and fluffy, at least three to five minutes.

Using the mixer on low speed, add eggs one at a time waiting 30 seconds between each addition to make sure the eggs are well incorporated.

Add extracts, lime juice, lime zest and lime juice crystals if using.  Stir to combine. 

Add flour and milk in three additions.  Alternating between 1/3 flour and then 1/2 milk, then another 1/3 of the flour, the remaining 1/2 of the milk and ending with the rest of the flour.  Blend just until well combined.

The cake can be made in a large 10 cup Bundt pan or 10 cup tube or Angel Food cake pan or in 2 standard 9 x 5 loaf pans.  Spray the pans well and if desired, line with parchment paper to ensure good release.  Make sure to spray the parchment paper as well.

Bake for 1 hour and 15 minutes for the loaves or 1 hour and 40 minutes for the Bundt or Tube pan.  The cake is done when a toothpick or skewer inserted in the center comes out clean and free of any visible moisture.


Remove from oven and allow to cool in pan for 10 minutes then remove from pan and place on a rack to cool completely.

Mix powdered sugar and lime juice together to create a glaze that will drizzle nicely off the spoon.  Spoon over the cake evenly and allow to drip down the sides of the cake.

Sprinkle lime zest over the glazed cake.

Allow glaze to set completely before cutting the cake. 

Store cake in airtight containers, tins, or wrapped well in plastic wrap to retain freshness.


Here is a printable PDF version of this recipe:
https://drive.google.com/file/d/0B_AD4OtxsqvmZ01ESkRwOHVyaE0/view?usp=sharing

See how I made this in my  YouTube Video:


Wednesday, April 20, 2016

Summer in a Bowl! Avocado, Mango Salad with Strawberries!


Today I want to share a delicious salad that I have been enjoying for a couple of weeks now for my lunch. This avocado mango salad with strawberries, hits all the notes, is super satisfying and will keep you coming back for more. I think you are going to love it!

This salad screams summer! It has all the freshness that you look for in a summer lunch. It smells amazing when you are making it and it looks amazing when you get it all in the bowl together. This one is a knock out the ballpark winner! I personally love a salad that has not greens in it from time to time. I love to have a chopped salad that has lots of veggies and fruits mixed together and this one is the perfect combination.

I know what you are thinking! Mango AND avocado AND strawberries AND onions? Really? Yes Really! Trust me on this one. This hits all those flavor notes you are looking for. Sweetness from the berries, tang from the mango, rich creaminess from the avocado and spicy bite from the onion. Lime juice brings the whole thing together with a palate cleansing citrus burst and married with a little bit of agave nectar to enhance the natural sweetness of the berries and the mango this is a real winner. Top this all off with a sprinkling of homemade chili lime seasoning and you have one out of this world experience in your bowl for lunch or dinner!

Like I said, I have been enjoying this for lunch the last couple of weeks. Normally I only eat two meals a day so Rick and I either enjoy breakfast and dinner or brunch and dinner. This is the perfect afternoon offering. i have been pairing this with a hard boiled egg on the side and this takes me to dinner with no problem. This is light but filling and it will stay with you and give you what you need to get the job done.

This salad is enough for two people as a side dish to a nice piece of grilled chicken or you can even serve this on top of the grilled chicken or a nice filet of grilled or broiled fish! This salad has amazing potential. Make it fresh when you want to enjoy this because it won't keep very well past a day or so because the avocado may get to mushy and disappear if it is ever so slightly too ripe. So you will want to keep that in mind.

If you don't have access to fresh strawberries or they are not in season, you could use blueberries, blackberries or even cubed nectarine, plum or peaches would be great. You can basically make this work with so many different fruits! Don't have sweet onion? Use red onion or green onion to round it out. Don't like onion? Skip it! Make this salad your own and enjoy!


I used a homemade chili lime seasoning on my salad. If you would like to see it, stay tuned because I will be sharing that in an upcoming video! I know you are just going to love that seasoning because it is so versatile in so many different dishes! Keep an eye out for that coming soon!

I think this is the perfect summer salad. I hope you do too! I know that when you give this a try you are going to keep on making it all summer long!


I hope you give this salad a try and I hope you love it! 

Happy Eating!

Get the recipe on my website here:

You can see how I made this in my YouTube video: