Rolling into the end of our Christmas in July week we wanted to present one more gift idea in the form of a product review. We reached out to the people at Copper-Chef to ask if they would be willing to send us one of their pans to try out and review for you! They were so kind to send us one of their deep square copper chef pan sets complete with a fryer basket, steamer rack and a set of plastic utensils. Today we are going to share with you how we felt about this pan.
We have been using this Copper-Chef pan for about a month and have done everything from scrambled eggs to frying and making the mac and cheese from their cookbook which was included. Our opinion is that this pan is all that they say and it is really great! I love this pan for a number of reasons. First, it is sturdy, next it has great heat conduction due to the stainless steel plate on the bottom of the pan. Next we love the fact that this pan is square and deep and you can fit a ton into it. We also love that this pan goes from the stovetop to the oven with ease and can sustain heat up to 800 degrees! My oven doesn't even go that high! This gives you the benefits of cast iron without the weight of cast iron.
When I told my mom that I was getting one of these to review she got excited so I will be giving her one for a Christmas gift! I think this would make a great gift for anyone on your list! The newlyweds, the foodie, the college graduate just getting their first place or anyone who is starting out. I think this pan is a great addition to just about any cookware collection. In my case, I have had and have used a lot of cookware. Some great, some, not so great. This pan is great and I can see myself using it for a long time to come.
We demonstrated the non stick surface by frying an egg dry! Unheard of and anyone who knows anything knows that frying an egg dry can be problematic and virtually impossible to flip over, much less remove from the pan in one piece. This pan did just that. We also did the old, burn a piece of cheese test. We slapped a slice of American cheese down in that hot pan and let it go. The results were stunning and impressive.
I hope that if you are in need of a great pan or if you are in need of a great gift, you will consider checking out this Copper Chef pan because it is a great addition to any kitchen!
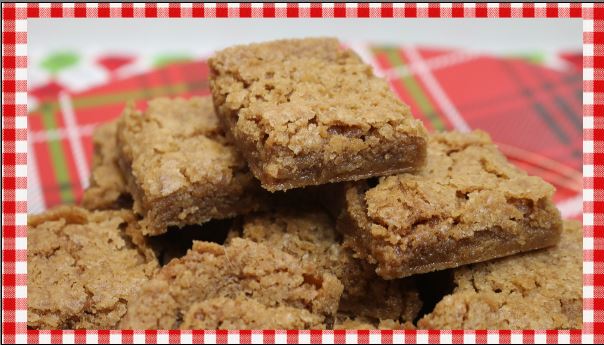
Today I had hopes of sharing a really great gluten free, dairy free, vegan shortbread cookie recipe for our Christmas in July week! HOWEVER, as all good plans of mice and men, this did not turn out as I had hoped. It did turn out tasty, just not short bready. So we soldier on and make lemonade out of our lemons. I figured it is always good to share a failure or two when they occur because we are all human and even the best of us makes a mess out of something from time to time.
That being said, I will say these were delicious but they were more of a chewy blondie texture with a crispy top than a short bread cookie that I was going for. That will teach me to just roll with a regular recipe when trying to make a gluten free, dairy free offering.
These are made out of a gluten free flour blend from Bob's Red Mill, some demerarra sugar and some Coconut Oil baking sticks. The dough went together really well. It looked just like a regular shortbread cookie, however when baked they took on another appearance. So we are now calling these a chewy butter bar because of their chewy texture and buttery flavor. They will get eaten. They would be a great addition to your holiday baking if you have a loved one or friend on your list who has these specific dietary needs.
In the end, I don't think this should be attempted as I did it, but I will post the recipe on my website in case you want to give it a whirl. I think you should do either or, but not both the gluten free flour and the coconut oil sticks. SO you could do a regular flour and coconut oil sticks OR you could do gluten free flour and regular butter. I think those would both be more successful than my attempt.
In the end, I learned a few valuable lessons. I hope that you take them away from this video as I did. Gluten free baking is not always as easy as it seems. You can't always just sub out one type of flour for another or one type of fat for another and expect things to go swimmingly. There are lots of other Gluten free cooks who share great information on YouTube. One of my faves is EZ Gluten Free. She can be found here: http://bit.ly/2aiMTnq
I think I will leave it up to those great cooks to sort out the gluten free, dairy free, vegan recipes. I will do my best to give them a try from time to time and hopefully we can all see great results!
I hope you enjoyed today's video, however funny, helpful or disastrous it was! in the end, we all had a good time and I enjoyed bringing it to you! I hope you are enjoying Christmas in July week! We will be back tomorrow with another gift idea for you to consider!
As Always, thank you for joining me and for being a part of this awesome community on YouTube!
Cream butter and sugar together
until light and fluffy.
Add salt and vanilla and
blend till smooth.
Add flour and combine until
smooth.
Press into a 9x13 inch baking
pan or a 1/4 size sheet pan.
"dock" the dough by
pricking the surface of the dough all over with a fork several times.
Place in the oven and bake
for 30 minutes or until the edges are slightly browned.
Remove from oven and cut into
squares or bars while still in the pan.
Return to the oven for an
additional 10 minutes.
Remove from oven and place on
a wire rack until cooled.
Store cookies in an airtight
container for up to 1 week.
NOTE: Originally I made this recipe with both
gluten free flour and coconut oil sticks in instead of regular butter. The result was not as I had hoped. So I recommend that you use regular butter
along with gluten free flour or use regular flour along with the coconut oil
stick, but not both together.
Since this week is Christmas in July week here on the channel I thought it might be fun to do a daily upload just for this week. Today I am sharing with you a review on a suggested holiday gift idea that you might want to consider! The Ninja coffee bar is on the list! This is the perfect gift idea for the coffee and tea lover or foodie on your list. This unit has so many features it is hard to pick a favorite!
The Ninja coffee bar is able to brew a single cup of hot or iced coffee or even a travel mug, a full or half pot of hot brewed or iced coffee without diluting the brew strength of our favorite morning beverage! This thing is amazing and I am happy to have this in my kitchen!
We drink a lot of iced coffee in the warmer months of the year and this machine will brew an entire pot of coffee, over ice without weakening the brew. The secret is in their special extraction method that allows the coffee to get ever bit of flavor out of the grind and depositing it in your cup!
I love that this has a removable water tank that can be washed and you can clearly see when it needs refilling! Also the fine mesh filter basket that eliminates the need for paper filters. This also came with an insulated travel mug and a manual milk frother that will make cold or warm milk froth for your favorite designer beverages.
We have been using this unit for about a month and feel so fortunate that Shark Ninja agreed to send us one to try so we could review it for you on our channel! We are elated with the performance, quality and look of this coffee maker. Calling it a coffee maker is kind of an insult considering all the great things this thing can do! It will make everything from a single plain cup of Joe to an entire pot. One travel mug of iced coffee on your way out the door? Done! Feel like a caramel macchiato? Easy! Everyone can make what they like! So simple and so easy! Do you have someone in your home who prefers to drink decaf? We do and it is easy for them to just brew up on glass of iced coffee and fix it the way they like it.
Ninja describes their machine like this:
The best coffeehouse in town is on your countertop with the Ninja Coffee Bar brewer. Ninja's patent-pending brewing technology is designed to deliver better, richer- tasting coffee with variable richness levels that are never bitter. Only the Ninja Coffee Bar brewer has Thermal Flavor Extraction, which truly unlocks the full flavor potential of your coffee. Auto-iQ One Touch Intelligence draws just the right amount of water needed from the reservoir, based on the brew size you choose (cup, travel mug, half carafe, or carafe) and brew type you select. Unique Brew Types:• Classic: Smooth, balanced flavor from your favorite coffee.• Rich: Richer, more intense than Classic, but not bitter coffee flavor that stands up to milk or cream.• Over Ice: Designed to brew hot over ice to lock in flavor for iced coffee that is not watered down.• Specialty: Super-rich concentrate designed to create specialty coffeehouse-style drinks. The 43 oz. Glass Carafe is perfect for entertaining. Keep your coffee hot with a 2 hour auto-off precise temp warming plate. Use the Ninja Easy Frother, which froths milk for making specialty coffeehouse-style drinks. Also included is a reusable permanent filter.
This is perfect for a holiday gift, wedding or shower gift or even for the dorm dweller! think of all the money they will save making their own drinks in their dorm instead of going to the coffee house for overpriced drinks!
We love it and hope you do to! Great quality!
I hope you will check this out and consider it for yourself or a gift this holiday season!
You can find more information on the Ninja website:
Christmas is five months from today! So it is fitting that this will kick off our Christmas in July week! The holidays are coming series always holds a special place for many of my subscribers. Many of you have told me how much you look forward to those videos. So as a special treat this year we are hosting an entire week of holidays are coming videos! We are kicking it off with these super simple and delicious holiday chocolate truffles.
I have been making these for years and have wanted to share them with you for the last five years, but they never seemed to fit in at the time when I had so many different things planned for you in years past. Well today I am pleased to share with you these wonderful holiday treats!
These truffles are very easy to make and they will pack a powerful punch with your friends and family when you present them with boxes full of these delicious chocolate gems as holiday gifts. Really only three ingredients are needed. Chocolate chips, condensed milk and extract of your choice.
You melt everything together, mix well and chill until you can roll into tiny balls of chocolate goodness. You can leave them plain, roll them in cocoa, ground nuts, coconut, coffee powder, chili powder, powdered sugar, crystal sugar, sprinkles, jimmies or sea salt. The possibilities are endless.
These should be kept in the refrigerator until they are given or served. You can also make these with white chocolate if you like or even peanut butter chips. Same concept. I have used chocolate condensed milk, but for many years used regular old plain sweetened condensed milk. So really the only limit here is your imagination!
I hope you give these easy holiday chocolate truffles a try and I hope you love them!
Get excited about the rest of Christmas in July week! We will have two holiday gift giving reviews as well as a couple more great holiday recipes coming your way!
Happy Holidays!
You can see how I made this in my YouTube video:
Noreen's Kitchen
Easy Holiday
Chocolate Truffles
Ingredients
3 cups chocolate chips
1, 14 ounce can sweetened condensed milk
1 teaspoon of the extract of your choice OR
1 tablespoon of your favorite liqueur
Coatings for outside:
cocoa powder
ground nuts
flaked or ground coconut
sea salt or flake salt
sprinkles
jimmies
espresso powder
crushed peppermint candies
toffee bits
Step by Step
Instructions
Combine chocolate chips and
condensed milk in a large bowl. Stir to
combine.
Melt in a double boiler until it forms a fudgy mass. Alternatively you can do this in the
microwave on high for one minute, then stir until it becomes a fudgy mass.
Refrigerate for at least 30
minutes or until the mixture is scoopable and somewhat solid.
Scoop truffles into teaspoon
sized balls. Roll between your hands
then roll in desired coatings.
Place on a baking sheet lined
with either a silicone mat or parchment.
Refrigerate finished truffles
for 30 minutes before serving.
Truffles should be stored in
the refrigerator or in a very cool spot after complete.
Truffles will stay fresh in
the refrigerator for 3 weeks.
Last week my friend Heather of the Kneady Homesteader Channel mentioned that she was having a hard time getting Spanish rice just right. This was not the first time she mentioned it to me. She likes to use the "Rice-a-Roni" brand of Spanish rice mix, but in an effort to get away from the box mixes and make her own, she was less than enthused about the outcome of several attempts. So I publicly promised to make her a video of how I do it.
This is that video. In my head I am humming the jingle, "Rice-A-Roni the San Francisco Treat, Rice-A-Roni the flavor can't be beat....." Well, you get the idea. According to their website: The DeDomenico family all enjoyed an old Armenian dish consisting of rice, vermicelli pasta and chicken broth. The rice and pasta were sauteed in butter before the liquid was added, giving the dish its distinctive taste.
In 1958, Vince DeDomenico decided to take this recipe and produce it for sale in grocery stores. He placed the rice and pasta in a box, and added a dry seasoning mix in place of the liquid chicken broth. Because this product was made up of half rice and half pasta, he decided to call it Rice-A-Roni.
Chicken Rice-A-Roni was first introduced in the northwestern states in 1958. With it came the first Rice-A-Roni commercial, featuring San Francisco’s Cable Cars and the now famous jingle. Created in San Francisco, Rice-A-Roni would soon be known to all as "The San Francisco Treat®!". Chicken RICE-A-RONI
The product was an immediate hit. Over the next couple of years, Rice-A-Roni spread across the United States and by 1962 was available for all of America to enjoy. Building on the success of the original Chicken flavor, several other varieties were added. Beef, Spanish and Fried Rice-A-Roni came along next and also became very popular.
Anyone who grew up in the 70's and 80's most likely ate this product and loved it. I know I did! My mom often put this out for a side dish at supper. Now that we are older and wiser, we are making an effort to move away from the processed, packaged, mixes of our youth and try to make those things from fresh, whole ingredients from our fridge and pantry. This is very simple to do and you are going to love it!
I admit that this one does have one small secret ingredient and that would be the tomato and chicken bullion that will give this dish the taste that I think Heather is missing from her package version. Aside from that, you already have what you need. Rice, broken angel hair or vermicelli pasta, onion, garlic, bell pepper, taco seasoning, canned tomatoes and butter. That's it! The other secret is in the preparation.
You can use butter like I have or you can use oil, of your choosing. I like to sautee the veggies just a little before adding the pasta and the rice. You will want to toast both of those until they take on a brown hue and emit a lovely nutty aroma. That is when you know it is time to move on, add your taco seasoning, broth and tomatoes. Give it a good stir and then cook like any other rice! Bring to a simmer, turn down the heat, cover and cook for 15 to 18 minutes or until the liquid is absorbed. Take off the heat and then allow to sit covered for an additional 10 to 15 minutes. Then fluff with a fork and serve.
I used broken angel hair pasta and I could have broken it up even more. You can also choose to use some orzo pasta if you like, but I wanted to stick closely to the boxed version for this so the angel hair it was. You can also adjust the seasoning if you like by adding more or less. I have used my homemade taco seasoning, but you can use your favorite packet version.
I hope that you give this version of homemade Spanish style Rice-A-Roni and I hope Heather gives it a try and finds that it hits the mark for her! I really think that the tomato and chicken bullion is the secret here!
As always, I hope you try it and I hope you love it!
Happy Eating!
You can see how I made this in my YouTube video:
Noreen's Kitchen
Homemade
Spanish Style Rice-A-Roni
Ingredients
2 cups parcooked or long grain rice
1 cup broken angel hair or vermicelli pasta
1, 14 ounce can petite diced tomatoes
1/2 cup onion, chopped
1/2 cup bell pepper, chopped
2-3 cloves garlic, minced
4 cups tomato and chicken broth
(see note)
2 tablespoons taco seasoning
4 tablespoons butter
Step by Step
Instructions
Melt butter in a large heavy
bottomed skillet or stock pot over medium high heat.
Add onion, garlic and bell
pepper. Stir well to coat.
Add rice and broken pasta to
the pan and stir to coat.
Continue over medium high
heat, stirring occasionally until the pasta and the rice take on a nutty aroma
and a slightly toasted appearance.
You may hear popping during this process.
Add taco seasoning and stir
well.
Add tomato chicken broth and
tomatoes and stir well to combine.
Bring to a simmer, turn down
to medium heat and cover. Cook for 15
to 18 minutes or until the majority of the liquid appears to have been
absorbed. Do not remove the lid.
Turn off the heat and remove
the pan to a cool burner or trivet.
Allow to sit and steam for 10 to 15 minutes before fluffing and serving.
NOTE: I have used Knorr Caldo Tomate con sabor
Pollo. Or Tomato broth with
chicken. This bullion can usually be
found in the Latin foods section of your grocery store. It has a red cap and is next to the chicken
and beef bullions.
Today I wanted to share with you a way I have recently discovered to make the very best sauteed mushrooms we have ever enjoyed. Normally I would saute mushrooms with butter, onion, Worcestershire sauce and a few seasonings like fresh garlic, salt, pepper and even a bit of Italian seasoning. That is a lot going on there. No more! The way I have discovered is the best ever! Trust me on this one! My girls ask me to make mushrooms all the time, even if the really don't go with the meal.
I have recently been able to get some beautiful white button mushrooms from my farm store where we get our milk. They are hands down, but prettiest mushrooms I have seen in a long time and since I can get them in bulk, I can make as much or as little as I like, however I normally make at least one pound at a time, but today I am doing two because we are having these along with a hot hamburger plate for dinner.
These start with a half a stick of butter, melted, then I add the cleaned mushrooms to the pan and toss them in the butter. Then I add a teaspoon of beef bullion powder and a teaspoon of seasoning. I am using a garlic pepper seasoning called "Harlem Garlic Pepper" from Badia, I am totally addicted to this seasoning and have been adding it to a lot of different dishes as of late. This is super garlicky. Like garlic and garlic and garlic and black pepper and salt. I get mine at my local Food Lion in the Latin foods section, but anywhere that sells this brand or has a great Latin food selection, will have this seasoning. Badia is one of my favorite ethnic brands and I have a lot of different selections from them in my spice collection because they are delicious and affordable!
Toss all those spices and bullion powder in with the mushrooms and then put a lid on your pan, over medium high heat. Leave it alone, don't even peek for at least 15 minutes. When you come back the pan will be filled with all those good mushroom juices mixed with the butter. Now remove the lid and let the pan continue to simmer for another 10 minutes or until most of the liquid is evaporated and the sauce is reduced. When you come back the pan will sound like it is sizzling a bit. This will be a good indicator that all the water is gone and all you have left is mushrooms, butter and amazing concentrated flavor!
Now enjoy taste these mushrooms and tell me they are not amazing! The earthy flavor of the mushroom really comes out and is enhanced by that little bit of bullion powder and seasoning. These are perfect in my opinion. When your teenagers ask you repeatedly for something, you know it must be good. If you are not a mushroom lover, I apologize, but you are really missing out!
I hope you give this method of sauteing mushrooms a try because I promise you that you are going to love them!
Happy Eating! You can see how I made these in my YouTube video:
Noreen's Kitchen
Best EVER
Sauteed' Mushrooms
Ingredients
2 pounds button mushrooms, cleaned
4 tablespoons butter
1 teaspoon beef bullion powder
1 teaspoon garlic pepper seasoning
Step by Step
Instructions
Melt butter in a large heavy
bottomed skillet or stock pot over medium high heat.
Add mushrooms and stir to
coat.
Add bullion powder and garlic
pepper and stir well to combine.
Cover and allow to cook for
15 minutes or until the mushrooms have rendered all their liquid and have
become soft.
Remove lid and continue to
cook over medium high heat until you hear a sizzle, the liquid has evaporated
and the mushrooms are lightly browned.
All that should be left in the pan is a beautiful buttery mushroom sauce
and mushrooms.
Serve with your favorite
steak, meat loaf, or anything you like!
Today I am making a double jerk chicken. This chicken is called double jerk because we are marinated the chicken in a wet jerk marinade and then grilling it over an open flame and then dousing it with a delicious, sweet and spicy Caribbean style BBQ sauce. This chicken is THE BOMB! Seriously! The combination of the spicy marinated chicken and the sweet and spicy sauce is to die for!
I have used chicken thighs, which is kind of a departure for me. I don't often use them and certainly don't use them bone in and skin on, but in this instance because they are going to be cooked over a very hot, open charcoal flame, I went this route. This will help the chicken to stay moist and tender and retain it's juiciness. In the end, this grilled double jerk chicken was so delicious, I may be a convert to chicken thighs!
The marinade for this is full of the flavors of the Caribbean! Doing a bit of research, using what I already know about jerk marinade and consulting my friend Liza, I have put together, what I think is a super easy, user friendly marinade that anyone can make, no matter where they live!
Traditionally, Jerk is heavy on the heat that comes from Scotch Bonnet peppers. I have a hard time finding those locally and do not have them growing in my garden, but will be on the lookout for some seeds for future planting! Then we built the marinade with a citrus base. Orange, pineapple and lime juices were added along with green onion, sweet onion, fresh grated ginger, Habanero pepper, olive oil and all the spices that you know should go in a good jerk. Allspice, clove, cinnamon, nutmeg and of course onion powder, garlic powder salt and pepper as well as fresh thyme. You can use dry thyme, but the fresh thyme really gives the jerk something special you don't get from the dried version.
I wazzed this all up in my drink blender and poured it into a zip top bag with the chicken thighs. We allowed this to marinate for about an hour and a half before placing on the very hot grill for five minutes per side. When the chicken was cooked through, it may have looked burned, but that is beautiful and flavorful char that is sought after in a good jerk chicken! We slathered on some of my homemade sweet and spicy Caribbean style BBQ sauce and let it set to a nice shellac. Then we removed it from the grill and allowed it to rest for about five minutes before serving.
This chicken was tender and juicy with over the top flavor. Trust me, you won't be disappointed with this meal!
I hope you give this double jerk chicken a try and I hope you love it!
Happy Eating!
You can see how I made this double jerk chicken in my YouTube video here:
Noreen's Kitchen
Jamaican Style Marinade
Ingredients
1 1/2 teaspoons ground allspice
1/2 teaspoon ground cinnamon
1 teaspoon onion powder
1 teaspoon garlic powder
1/4 teaspoon ground nutmeg
1 tablespoon fresh ginger, grated
1/4 cup extra virgin olive oil
1 tablespoon salt
1 teaspoon cracked black pepper
6 green onions, chopped
1 medium sweet onion, chopped
1/4 cup fresh lime juice
1-2 habanero
peppers
1/2 cup orange juice
1/2 cup pineapple juice
6-8 sprigs fresh thyme
Step by Step
Instructions
Place all ingredients into
the vessel of a food processor or high speed blender.
Mix well to liquefy.
Pour marinade over chicken
pieces and allow to marinate for at least one hour before grilling, baking or
broiling.
Discard any unused marinade
to avoid cross contamination.
I am getting ready to make some jerk chicken on the grill and wanted to make it extra special by giving it a baste with some delicious BBQ sauce. If you are like me, you prefer to make your own when you can and this sauce is over the top delicious!
I made it my goal to replicate or at least come close to a jerk dipping sauce that a local restaurant serves and they wouldn't give me their recipe. Lucky for me I don't need one! I figured it out myself! I can make this anytime I want and slather it on chicken, pork, burgers or use it as a great dipping sauce or even a base for a sweet and spicy salad dressing!
This sauce uses my basic BBQ sauce as a starting place. What makes this Caribbean is the spice blend. It is also what takes this over the top amazing! Ketchup, molasses, orange juice, apple cider vinegar, Worcestershire sauce, Habanero pepper sauce, garlic powder, onion powder, paprika, salt, pepper, allspice, cinnamon, nutmeg and clove all come together to make a sauce that you will just want to eat off a spoon it is that delicious!
We made some Jamaican Jerk chicken thighs for another video that will be coming up this week as a collaboration with the Common Man Cocktails channel. You will see that soon. We marinated our chicken in a wet Jerk marinade and then grilled on a very hot charcoal grill. Then we slathered on this sauce and let it come to a shellacked perfection. They were delicious and amazing and I cannot wait for you to see how they came together.
I knew I had to share this sauce with you though, because I know you would want to know. You really need to make this sauce! Since I made it, we have used it to dip chicken in, on pork chops, on fries and I even put it on a burger and it was amazing!
I hope you will give this sweet and spicy Caribbean style BBQ sauce a try and I hope you love it! Happy Eating! You can see how I made this in my YouTube video here:
Noreen's Kitchen
Sweet & Spicy Caribbean Style
BBQ Sauce
Ingredients
2
cups ketchup 1 cup dark brown sugar 1/2 cup molasses
1/2
cup orange juice
1/4
cup lime juice
1/2
cup apple cider vinegar 2 tablespoons Worcestershire sauce 1 tablespoon paprika
1 teaspoon garlic powder
1 teaspoon onion powder
1
teaspoon ground ginger
1
teaspoon ground allspice
1/2
teaspoon ground cinnamon
1/4
teaspoon ground clove
1/4
teaspoon ground nutmeg
1
teaspoon hot sauce 1 teaspoon salt 1 teaspoon cracked black pepper
Step by Step
Instructions
Combine ingredients in a
saucepan.
Stir well to combine.
Allow to come to a simmer
over medium heat stirring occasionally to avoid scorching.
Remove from heat and allow to
cool.
Store in a jar in the
refrigerator for up to 1 month.