
}]; Noreen's Kitchen: candy
Showing posts with label candy. Show all posts

Monday, February 13, 2017

Sweets for your Sweetheart! Cupid's Valentine Bark Recipe!


One last fun Valentine treat idea before tomorrow!  Here is some delicious and simple, Cupid's Valentine bark! You can throw this together tonight and have it read to enjoy, serve or share tomorrow!  If you are able to take homemade treats this would be a great idea for a class party or even a church event.  Sweet and stunning, this bark is delicious and super pretty!  Perfect for your Valentine or sweetheart and kids will love getting in the kitchen with you to help make this super simple treat!


Just like any other "bark" this one starts with white chocolate chips.  I have also used candy melts in red and pink.  Get those melted in the microwave on thirty second bursts, stirring after each until you have smooth and creamy melty goodness!   I like to add about a tablespoon of coconut oil when I use baking chips to help encourage the melting process and help it to be nice and smooth.  Sometimes those baking chips can have emulsifiers and additives that preclude proper melting, but a bit of coconut oil, or if you don't have that, some shortening will work as well.  


Prepare a baking sheet.  I like to use non stick foil then spray that with some cooking oil spray.  I prefer coconut oil spray but whatever you have will work great.  Pour the white chocolate onto the sheet and spread evenly, but not too thin.  You don't have to worry about covering the whole pan.  Just make a nice even layer.  Then take the two colored chocolates and drizzle how ever you like.  Let your inner Jackson Pollak out and see what happens.  Then I took a coffee stir stick and ran it through up and down then back and forth.  Just to give it that pretty, draggy look that you see in professional candies.  Make it look nice and swirly.  But don't swirl too much or you will end up with a muddy mess.

Now for the fun part!  I found some pretty little pink, heart shaped marshmallows that I tossed on the melted chocolate.  Then I added some pretty candy sixlet pearls in pink, blue, white and black.   Toss those into the chocolate with some force to embed them in the chocolate so they will set in there and not fall off when you break this up.  Then I sprinkled a generous amount of red and white sugar and red, pink and white pearl nonparels, along with some little candy "x's and o's".  Such a fun and festive look!  I popped this pan in the fridge for about an hour to set.

Breaking up the bark is easy, but since we have added the pretty marshmallows, I want to be careful to have full pieces  that don't pull those apart.  Break this up the best you can for pretty shards of deliciousness!  I packaged mine up in some pretty paper boats then wrapped them in cello bags.  I got those kits at the big box store I also put a few pieces in cupcake papers for fun.  This would be a great idea for serving at a party or at a school or church function.  
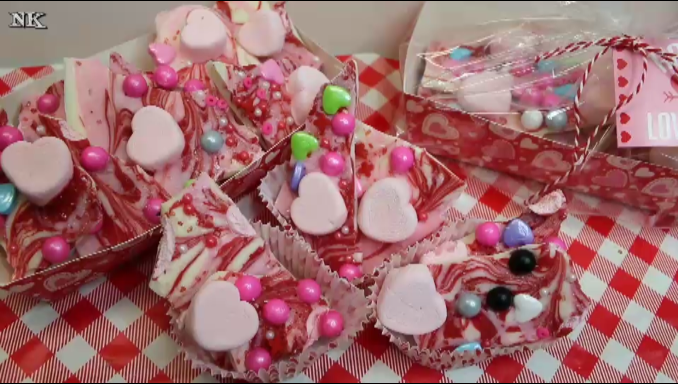


I hope you give this Cupid's Valentine bark a try and I hope you love it!

Happy Eating and Happy Valentines Day!

You can see how I made this in my YouTube video here:


A Printable version of this recipe is available on my website:  

Noreen's Kitchen
Cupid’s Valentine Bark

Ingredients

4 cups white chocolate chips
1 cup red candy melts
1 cup pink candy melts

Colorful mini marshmallows (heart shaped)
Assorted sprinkles
Coated chocolate candies/pearls

Step by Step Instructions

Place the white chocolate chips in a large, microwave safe bowl.  Heat in the microwave on high in 30 second bursts, stirring after each until the chocolate is smooth, creamy and free from lumps.

Melt the candy melts in microwave safe containers, I put mine in pint mason jars.  Melt on 30 second bursts, stirring after each until the candy is smooth, creamy and free from lumps.

Prepare a baking sheet by lining with foil (I like the non stick type) and spraying it well with cooking oil spray.

Pour the white chocolate onto the baking sheet and spread out in an even layer.  Don’t worry too much about covering the entire surface of the pan, that may be too thin. 

When the white chocolate is spread, take the colored candy melts and drizzle haphazardly over the white chocolate.  Let your inner Jackson Pollak out to play.  Just drizzle away with one color then move on to the next. 

When you have done drizzling, take a skewer, a coffee stirrer or a butter knife and drag it gently through the chocolate in one direction up and down then the other.  So the swirls become pulled and beautiful.  Be sure not to swirl too much because that will muddy the colors.

Now you can top your bark with marshmallows, sprinkles and chocolate coated candies to your heart’s content. 

When you are done decorating, place the sheet pan in the refrigerator for 1 hour to allow the bark to set completely.

When the bark is set, break into beautiful shards and package in pretty bags to give away to your sweethearts!


Business Inquiries can be sent to:
info@noreenskitchen.com

Sign up for my weekly newsletter and get exclusive recipes, video tutorials and articles!
http://eepurl.com/TZCV5

Don't forget to subscribe!  New videos Every Monday, Wednesday, Friday and Sunday!
http://bit.ly/17JVMTP

Subscribe to Rick's Tips Channel for Home Improvement and DIY Tips!  New videos every Saturday!
http://bit.ly/1ixCK8W

Check me out on social media!

Facebook:    http://on.fb.me/12bdibt

Twitter:         @noreenskitchen

Instagram:    http://bit.ly/12bdqrp

Google +         http://bit.ly/1o5GMYy


Friday, September 2, 2016

Make Life Sweeter!! Try a Candy Club Subscription! A Box of Sweet Deliciousness Delivered To Your Door!!


Go to Candy Club's Website:  http://candy.do/2bAeeCh
Use Coupon Code: 50f-candydeal to get 50% off your first order and free shipping!

Today we are excited to share the Candy Club box!  The premier candy of the month club!   The best part?  You get the choice of either selecting a master curated box that is specially hand selected for you or you can curate your own box!  That is what I did!  This was so much fun! 

I was able to go to their website, which is super easy to navigate and choose three different candies from their selection, that rotates. They had a ton of awesome things to pick from!  So many that it was hard for me to pin point exactly what I wanted.  In our family we are huge gummy fans and there was no shortage of fantastic gummy candy.  Both regular, super chewy, sour, super sour.  Bears, fruits, kids, belts, licorice, chews, cream chews and more.  In the end I chose some orange cream chews, some of our favorite Gimbal's 40 flavor jelly beans and the wierdest candy I have ever seen, gummy chicken feet.  Yes, you read that right!  Chicken feet.  The Candy Club then adds in a handful of another fun treat that will be a surprise when you receive your box.  In my case we got some delicious caramel toffee chews in different flavors like vanilla, butter rum, maple and raspberry!  


Candy Club estimates that there are over 7000 possible combinations that you can choose from with their newest "pick your own" plan.  You can also choose from different size boxes that start at $19.95 per month.  There is no obligation and you can cancel any time.  You can go all in or you can just get one.  

The box has over three pounds of candy when you receive it.  The portions are generous and they are well packaged.  They come in a great box that is protected from the heat with mylar bubble wrap and the containers are secured with a special box insert so they won't roll around in transit.    The package arrived very quickly in under a week and when I placed my order they let me know they would update me on the shipping.  I was notified when the order shipped and I received it a few days later!  I was impressed all the way around.


I think that Candy Club would be a great idea for just about any gift giving occassion!  With back to school upon us this would be a great treat for you children or grand children for the beginning of the new school year or even a great treat for the college student who is away from home to remind them you are thinking of them.  I think this is a great idea for the upcoming holiday season as well!  Knock a bunch of your friends and family off your gift list by sending them a month of Candy Club to enjoy during the holiday season, making their holiday even sweeter!   Giving Candy Club will also help you to stay on a budget because their price points are great!  


Candy Club has extended a special offer for Noreen's Kitchen subscribers!  Using the coupon code listed above and the link provided, you will receive 50% off your first order as well as free shipping!  That is an awesome deal!  You will get your first box to try at just under $10!  What do you have to lose?  Go to the www.candyclub.com and get started on selecting the candy for your first box!  Give it a try!

I hope you try Candy Club and I hope you love it!  How could you not?  

Happy Eating!

FTC DISCLOSURE: Thanks to Candy Club for sponsoring today's video!  All opinions expressed are those of myself and my family and they are honest and true.  

You can see our family Candy Club unboxing and tasting on our YouTube channel here:


Tuesday, July 26, 2016

Christmas In July ~ The Holidays Are Coming ~ Easy Holiday Chocolate Truffles!!


Christmas is five months from today!  So it is fitting that this will kick off our Christmas in July week!  The holidays are coming series always holds a special place for many of my subscribers.  Many of you have told me how much you look forward to those videos.  So as a special treat this year we are hosting an entire week of holidays are coming videos!  We are kicking it off with these super simple and delicious holiday chocolate truffles.  

I have been making these for years and have wanted to share them with you for the last five years, but they never seemed to fit in at the time when I had so many different things planned for you in years past.  Well today I am pleased to share with you these wonderful holiday treats!


These truffles are very easy to make and they will pack a powerful punch with your friends and family when you present them with boxes full of these delicious chocolate gems as holiday gifts.  Really only three ingredients are needed.  Chocolate chips, condensed milk and extract of your choice.

You melt everything together, mix well and chill until you can roll into tiny balls of chocolate goodness.  You can leave them plain, roll them in cocoa, ground nuts, coconut, coffee powder, chili powder, powdered sugar, crystal sugar, sprinkles, jimmies or sea salt.  The possibilities are endless.


These should be kept in the refrigerator until they are given or served.  You can also make these with white chocolate if you like or even peanut butter chips.  Same concept.  I have used chocolate condensed milk, but for many years used regular old plain sweetened condensed milk.  So really the only limit here is your imagination!

I hope you give these easy holiday chocolate truffles a try and I hope you love them!  


Get excited about the rest of Christmas in July week!  We will have two holiday gift giving reviews as well as a couple more great holiday recipes coming your way!

Happy Holidays!

You can see how I made this in my YouTube video:


Noreen's Kitchen
 Easy Holiday
Chocolate Truffles


Ingredients
3 cups chocolate chips
1, 14 ounce can sweetened condensed milk
1 teaspoon of the extract of your choice OR
1 tablespoon of your favorite liqueur

Coatings for outside:
cocoa powder
ground nuts
flaked or ground coconut
sea salt or flake salt
sprinkles
jimmies
espresso powder
crushed peppermint candies
toffee bits

Step by Step Instructions

Combine chocolate chips and condensed milk in a large bowl.  Stir to combine.

Melt in a double boiler until  it forms a fudgy mass.  Alternatively you can do this in the microwave on high for one minute, then stir until it becomes a fudgy mass.

Refrigerate for at least 30 minutes or until the mixture is scoopable and somewhat solid.

Scoop truffles into teaspoon sized balls.  Roll between your hands then roll in desired coatings.

Place on a baking sheet lined with either a silicone mat or parchment.

Refrigerate finished truffles for 30 minutes before serving.

Truffles should be stored in the refrigerator or in a very cool spot after complete.

Truffles will stay fresh in the refrigerator for 3 weeks.


Enjoy!