}]; Noreen's Kitchen: apple
Showing posts with label apple. Show all posts

Monday, October 24, 2016

Absolutely Apple Pie Spice and Baking Blend ~ Apple Pie Spice Recipe!!


I recently shared an apple pie rugelach recipe in which I used my homemade apple pie spice blend.  Today I want to share this blend with you so that you can make it for yourself and use it in your baking for the upcoming holiday season!

This blend is simple and contains many spices that you most likely already have on your spice rack or pantry shelf.  This one contains the basics, cinnamon, nutmeg, allspice,clove and my secret ingredient, cardamom!  The cardamom adds a citrusy note that is not available anywhere else.  It really is delicious and reminiscent of many Scandinavian recipes for the holidays including Christmas Stolen.  


This recipe makes about 1/2 cup and will be very useful this season.  To  use, simply add up the amount of spices your recipe calls for and use an appropriate amount.  For instance, if your recipe calls for a teaspoon of cinnamon and 1/2 a teaspoon of nutmeg, a 1/4 teaspoon of clove and 1/4 teaspoon of allspice you can simply use two teaspoons of this blend.  The added cardamom will only add a delicious extra flavor profile to your finished recipe.


I have stored mine in a 1/4 pint mason jar and I think these would make lovely take away gifts for your holiday table.  Especially for your Thanksgiving dinner!  Then your guests could use these for their holiday baking and remember you while they do it.  These would make lovely place card holders for your guests to take home as well!  Decorate to fit your tablescape and you are all set!

I hope you give this homemade apple pie spice and baking blend a try and I hope you love it!

Happy eating!

You can find a printable recipe for this on my website here:

You can see how I made this spice blend in my YouTube video here:


You can find Molly Green Magazine on their website: http://bit.ly/2cTAqMh

Business Inquiries can be sent to:
info@noreenskitchen.com


Noreen's Kitchen
Apple Pie Spice and
Baking Blend


Ingredients
4 tablespoons ground cinnamon
1 tablespoon ground allspice
2 teaspoons ground nutmeg
1 teaspoons ground cardamon
1 teaspoon ground clove


Step by Step Instructions

Combine all ingredients in an airtight container and give it a good shake.

Store in a cool, dry and dark place and use within 6 months for best flavor.

Use by the teaspoon in recipes calling for apple pie spice or cinnamon for a delicious alternative to the single spice. 


Enjoy!


Monday, October 10, 2016

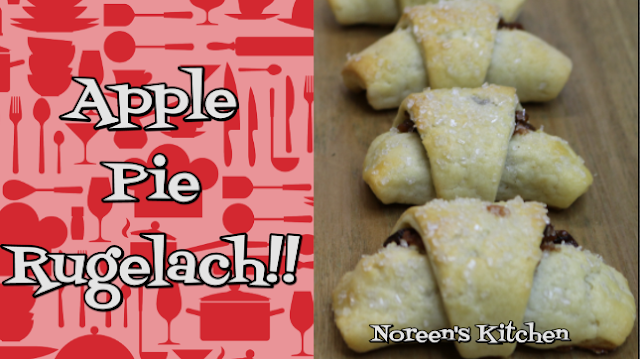
The Apple of my Pie! Apple Pie Rugelach Cookie Recipe! Noreen's Kitchen

Noreen's Kitchen, Copyright 2016


Today we have a fun and delicious collaboration to share!  I am teaming up with Jac, from the Vegetarian Baker channel to do a couple of videos in celebration of National Cookie Month!  Did you know there was a national cookie month?  Well there is!  And October is the auspicious occasion!  So, to honor all things cookie, we are teaming up to share a couple of pie inspired cookie recipes.  Jac will be sharing his pumpkin pie cookies and I am sharing these amazing, flaky, rich and delicious apple pie rugelach!

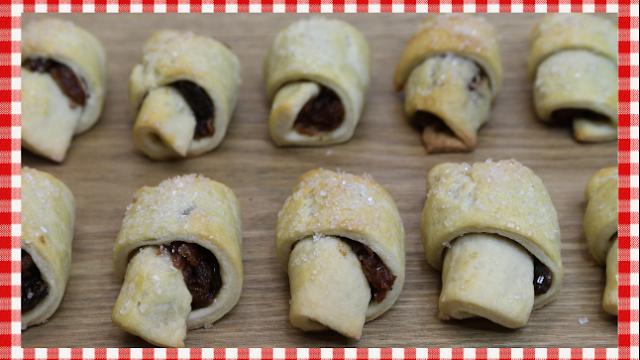
If you are not familiar with what rugelach is, it is a little Jewish or Israeli cookie that when translated to English means "little twist".  they typically look like a crescent and the original version is filled with cinnamon, sugar and ground nuts.  However they fillings can run the gamut.  Some of my favorites include raspberry or apricot jam with ground nuts and cinnamon, Nutella or hazelnut spread, brown sugar, you name it!  If you can roll it up in the dough, you can make these cookies any way you like them.

This dough is so amazing and reminds me very much of the dough for my grandmother's kifli recipe.  It is a very short dough, meaning it has a lot of fat and a little flour, just to hold it all together.  A dash of sugar and a splash of vanilla extract add loads of delicious mild flavor to this cookie dough that will be enhanced by the filling you choose to put inside.    This is very easy to make in the mixer, just cream the fats, add the flour and flavorings and blend till it comes together.  Then I wrap the whole thing in some plastic and stow it in the fridge for at least a half hour.  You can make this dough a couple days in advance in preparation for a big baking marathon and have it all read to go.

Noreen's Kitchen, Copyright 2016


When you are ready to make the cookies, divide the dough in four and only keep out one portion to work with.  Roll it into a 12 to 14 inch circle then using a pastry or pizza cutter, divide the circle into 12 wedges.  These will be your cookies.  

I made a filling out of shredded apples, golden raisins, sugar and apple pie spice.  Sauteed in a bit of butter and let it all cook down into an beautiful thick mixture that was perfect for filling my rugelach.    I allowed the filling to cool while the dough was in the fridge.  You just don't want the filling to be hot otherwise it will melt all that butter and cream cheese in the dough.

Then you fill you cookies by adding a scant teaspoon to the wide end of each wedge and the roll up like a crescent roll.  Place each cookie on an awaiting baking sheet lined with either a parchment or a silicone mat.  I brushed the rugelach with egg wash and sprinkled with some coarse crystal sugar for crunch and decoration.  Baked them for 15 to 18 minutes until they were lightly browned on top and bottom.  Then let them cool on the baking sheet for five minutes before removing to a rack to cool completely.

These cookies are super delicious and you are going to love them.  They taste like apple pie, of that you can be sure and they will disappear quickly.  

I only made half of the dough because that is all the filling I had.  The rest of the dough was wrapped and placed in the freezer.  It will be good for up to six months but I will be using mine sooner.  Just thaw in the fridge for a day or so when you want to use it and proceed as usual.  

Noreen's Kitchen, Copyright 2016


I hope you will check out the Vegetarian Baker Channel!  He has so many delicious vegetarian versions of awesome recipes I know you will love it!  Hit is subscribe button and show him some YouTube family love!  Links can be found below!  His pumpkin pie cookies look like they will be amazing!

I hope you give these apple pie rugelach a try and I hope you love them!


Happy Eating!

You can find a printable version of this recipe on my website here: http://bit.ly/2dJX8VN

Click to go to the Vegetarian Baker Channel:  http://bit.ly/2dSqK1q

Jac's Pumpkin Pie Cookie Video Here: http://bit.ly/2e7PSpa

You can see how I made these cookies in my YouTube video here:


Noreen's Kitchen
Apple Pie Rugelach

Ingredients

Dough
1 brick (8 ounces) cream cheese
1 cup (2 sticks) butter, cubed
1 cup sour cream
4 ½ cups all purpose flour
¼ cup granulated sugar
1 tablespoon vanilla extract
1 teaspoon salt (optional)

Filling
3 medium apples, peeled and grated
½ cup golden raisins
½ cup granulated sugar
¼ cup (1/2 stick) butter
2 teaspoons, apple pie spice blend
1 egg
1 tablespoon of water
Crystal sugar for garnish

Step by Step Instructions

Using a stand mixer, cream butter and cream cheese until smooth and fluffy.

Add sour cream and beat until incorporated.

Add sugar and vanilla and whip to combine.

Add flour and salt and mix until incorporated.  Do not over mix.

Wrap dough in plastic wrap and refrigerate for at least half an hour.  Longer is better. 

To make the filling:

Melt butter in a skillet over medium heat.  Add apples, raisins, sugar and spices and stir well.  Cook for 10 minutes, stirring occasionally to prevent burning.  When all the water has cooked out and the apple mixture has thickened, remove from heat and allow to cool to room temperature.

Preheat oven to 350 degrees.

Divide dough into four equal portions.  Return three to the refrigerator.

Roll out your working portion of dough into a 12 to 14 inch circle.  Using a pastry or pizza cutter, divide the circle into 12 even wedges.

Spoon the apple filling onto the dough using a scant teaspoon of filling for each wedge of dough.  Roll from the wide end like a crescent roll into the cookie.

Place the rugelach onto a baking sheet lined with a parchment or silicone mat.

Beat egg and water together to create an egg wash.

Brush each cookie with the egg wash evenly.  This will give the cookies a nice sheen.

Sprinkle each cookie with crystal sugar if desired for crunch and garnish.

Bake cookies, one pan at a time for between 15 and 18 minutes or until lightly golden brown on the top and the bottom.

Remove from oven and allow to cool on the baking sheet for five minutes before removing to a rack to cool completely.

Store these rugelach in an airtight container for up to a week.  I promise they won’t last that long.

I only made two dozen cookies with the amount of filling shown in this recipe.  I froze the remaining dough.  You can tightly wrap the dough in plastic wrap and then place it in a freezer bag and freeze for up to six months.


Enjoy!


The Best Way to Slice an Apple: Noreen's Kitchen Basics!!


Today I want to share with you the most basic of kitchen basics, how I slice an apple without an apple slicer and only a knife.  This is as basic as it gets, but maybe you had not thought of it before.  You don't need an apple wedger.  Frankly, I find them to be annoying and the slices are always too big and the core is not ever in the same place anyway and you end up with a mess.  Especially if your apple is a little soft.  So I am going to show you how I do it!

Think of your apple as a cube instead of a sphere.  Then slice of one side close to the core and then turn it and do the same on the other side.  Then cut off the bits left on either side of the other two sides.  Are yo still with me?  You should have the core left.  I should look like a rectangle.  You can discard this, use it for your livestock or put it in your compost.  There is very little waste this way.

Now you can lay the large pieces down flat and slice them as thick or as thin as you like.  This makes things nice and easy for packing lunches, making pies or crisps or slicing up apples to serve with caramel dip!  Nice even slices and you control the thickness.

This is also a great way to speed slice apples.  Last year I showed someone how to do apples this way and she said the would never do it another way again.  I learned this technique from a pastry chef at a five star restaurant in Arizona.  Sometimes it's the little things that make the biggest difference!

I hope you give slicing apples like this a try and I hope you love it!

Happy Eating!


Rada Cooks Knife:  http://amzn.to/2dgrHCY

You can see how I did this in my YouTube video here:


We're On a Roll! Apple and Brie Stuffed Chicken Breast Recipe!!

Noreen's Kitchen Copyright 2016


Today I want to share this amazing recipe for apple and brie stuffed chicken breasts, inspired by a trip to the store.  The other day I was in the grocery store and they had a sale on those lovely stuffed chicken breasts in different varieties.  You know, the frozen ones that are breaded?  Like chicken Cordon Bleu, chicken marco polo, and chicken Kiev.  They also had one that was stuffed with apples and brie.  This was my inspiration for today's recipe.    So simple and delicious and relatively easy to prepare.  This screams autumn and your family is going to love this one.  I think this is super appropriate for a dinner party.  So call your friends and make a date!

Noreen's Kitchen, Copyright 2016


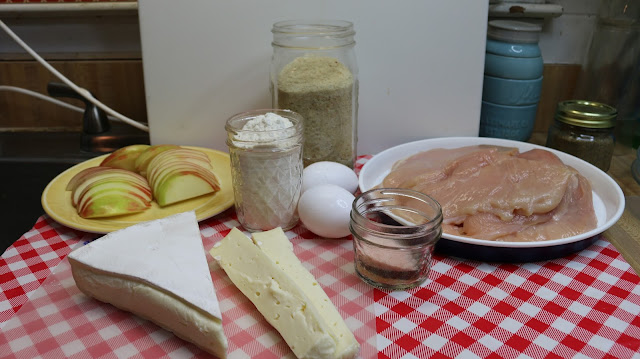
I started off with four chicken breast halves that I butterflied and pounded lightly with a mallet.   Then I seasoned both sides with a blend of salt, pepper, poultry seasoning and garlic powder.  Then laid a couple slices of honeycrisp apple and a piece of brie cheese, which had the rind removed.  I rolled it all up in the chicken and breaded that with a classic breading station of flour, egg and seasoned breadcrumb.  I laid these stuffed chicken rolls on a baking sheet lined with a silpat.   I gave all the rolls a good spray with cooking oil spray before placing them in a 375 degree oven for 45 minutes.

These were quite delicious.  The chicken was moist and flavorful and the apple and brie stuffing was really savory and incredible!  Everyone in my family loved this!  I served the stuffed chicken rolls with a wild rice blend and steamed broccoli.  Some cranberry or apple sauce or spiced apples would also make a lovely accompaniment.  


Noreen's Kitchen Copyright 2016


These chicken rolls are super simple to make and you can even freezer bank them by going through all the steps but instead of baking them off, place the baking sheet in the freezer until they are completely frozen.  I recommend overnight.  Then you can portion these and wrap them individually in freezer bags.  When you are ready to make them you just pull out however many you need and place them on a lined baking sheet in a pre heated 400 degree oven for about an hour.  This will ensure that the meat is fully cooked from the frozen state.

These were so delicious that I will be making them again very soon.  I hope you give these apple and brie stuffed chicken breasts a try sometime soon and I hope you love them!

Happy Eating!

You will be able to find a printable version of this recipe on my website: http://bit.ly/2dzBRBm


You can see how I made this in my YouTube video:


Noreen's Kitchen
Apple and Brie
Stuffed Chicken Breasts

Ingredients

4 boneless skinless chicken breast halves
1 Honeycrisp apple, cored and sliced thin
½ pound brie cheese, rind removed
2 cups dried bread crumbs
2 eggs
1 cup all purpose flour
1 teaspoon poultry seasoning
1 teaspoon garlic powder
1 teaspoon salt
1 teaspoon cracked black pepper

Step by Step Instructions

Preheat oven to 375 degrees.

Butterfly each of the chicken breasts and pound with a meat mallet in order to make a thin cutlet that can be used to create the rolls.  Set aside.

Using three pie plates; place flour in one, bread crumb in another and beaten egg in the last.  This will be your breading station.

Take each of the chicken breasts and lay it in front of you flat on a plate.  Place a piece of Brie on the meat then two or three slices of apple on top of the cheese.

Roll the chicken up, encasing the apple and brie.  Folding the sides in as you go if possible.  Like a burrito.  You can choose to secure the chicken with a toothpick if desired.  I did not.  As long as you bake these with the seam down, they should stay together.

Bread each chicken roll by dipping first in the flour, then in the egg and then in the bread crumb.  Be sure to coat the roll completely and if desired, you can double dip each one to give a much thicker crust. I found that just one dipping was sufficient.

Place each breaded chicken roll on a baking sheet that is covered with either parchment, foil on a silicone mat, seam side down. 

Spray the chicken rolls liberally with a cooking spray to encourage browning and crispness.

Bake for 30 to 45 minutes or until a meat thermometer reads 160 degrees.

Remove from oven and allow to rest for 5 minutes before serving.

You may have some seepage of cheese, but that is going to happen.  When you serve, you can simply spoon this over the roll.


Thursday, August 11, 2016

Back On Track For Back To School! On the Go Breakfast Cookies!!


These breakfast cookies are so delicious you will forget that they are good for you!  Filled with oats, almond butter, nuts and dried fruits, these cookies will disappear fast and your family will be asking for more!


Today I am participating in a "Back to School Breakfast Treats" collaboration with my friend Gretchen from Gretchen's Bakery channel!  If you are not familiar with Gretchen's channel, please be sure to pop over and watch her homemade apple pop tarts video when you are done here and be sure to hit that subscribe button!  Gretchen is truly amazing!

My contribution for this collab is going to be a protein and fiber packed breakfast cookie that will take you from morning till lunch and give your body what it needs to keep on going when those late nights and early mornings of the back to school schedule begin to catch up with you!  

These cookies are egg free, dairy free, gluten free and they can be vegan if you sub out the honey I used here for more maple syrup, molasses, brown sugar or even agave nectar.  You choose.  

I have used almond butter in my cookies but you can use peanut butter, cashew butter or sunflower butter if you prefer.  I have used lots of oats, golden flax sunflower and hemp seeds to bulk up the fiber and protein.  Then for crunch and sweetness I have added chopped dates and chopped pecans.  For moistness I added mashed bananas and coconut oil.  

Your imagination is your only limit here.  You can change these up to suit your tastes by adding dried fruits or nuts of any kind, shredded coconut, even a cup of chocolate chips would be nice.  I can think of several combinations that would be just as delicious!  This recipe is so versatile I know once you try it you are going to love it!


This recipe makes 24 cookies, if you drop them using the #16 disher which is approximately 1/4 cup in size.  Just make sure to flatten them slightly with a wet spoon before placing in the oven to bake.  These were perfectly done in just about 18 minutes in my oven.  Yours may differ.

These cookies are perfect for grabbing on the go.  Toss a couple in your bag and you are ready for the day along with your big mug of coffee or tea.  Ready to face whatever the day may bring, body nourished and caffeinated!  I prep these cookies by putting each one into a separate sandwich bag and place them in an airtight container on the counter.  If you don't think you will eat these inside of a week, then place them in the fridge for up to two weeks or in the freezer for up to three months.  These can thaw on the counter overnight for early morning enjoyment.

I hope you will take the time to go on over to my friend Gretchen's channel and subscribe and enjoy all the delicious homemade bakery treats that she shares every week.  The homemade apple pop tarts look amazing, simple and delicious and I know you are going to want to try them!  Be sure to use the links above!


I hope you give these breakfast cookies a try and I hope you love them!

Happy Back to School and Happy Eating!

You can find the printable version of this recipe for my cookies here:  

You can see how I made these in my YouTube Video:


You can see how Gretchen made here awesome Apple Pop Tarts in her YouTube video here:


Noreen's Kitchen
 Back To School
Breakfast Cookies


Ingredients

1 cup mashed banana
1 cup peanut butter or nut butter
1/2 cup honey**
1/2 cup pure maple syrup
1/2 cup coconut oil, liquified
3 cups rolled oats
1 cup whole wheat flour or gluten free flour
1/2 cup ground flax seed
1/4 cup sunflower seeds
1/4 cup hemp seed
1/2 cup protein powder* (see note below)
2 teaspoons ground cinnamon
1 teaspoon baking soda
1 cup dried fruit such as
     cranberries
     cherries
     dates or raisins
1 cup chopped nuts such as
     almonds
     pecans or walnuts (optional)


Step by Step Instructions


Preheat the oven to 350°F.

In a large bowl, stir together the banana, coconut oil, peanut butter, honey, maple syrup and vanilla.

In a small bowl, combine the oats, flour, flax seed, sunflower and hemp seeds,  protein powder, cinnamon, and baking soda.

Stir dry mixture into wet mixture until combined. Stir in dried fruit and nuts.

Drop dough onto cookie sheets that have been lined with parchment or a silicone mat.

Using a metal spatula dipped in water, press each mound of dough into a cookie approximately 2 1/2 inches in diameter and 1/2 an inch thick.

Bake, one sheet at a time, for 13 t 15  minutes or until lightly browned.

Remove from oven and allow to cool on the pan for five minutes before transferring to a wire rack to cool completely.

Store in an airtight container or zip top  bag for up to 5 days.  These can be stored in the fridge if you live in a super warm area.  This will prolong their freshness.  You can also freeze for up to 2 months. Thaw on counter before serving.

*NOTE:  If you don't have protein powder you can increase the flour by 1/2 cup
*NOTE: If you wish for these cookies to be vegan, sub out the honey for molasses, agave or golden syrup.