}]; Noreen's Kitchen: vegetable
Showing posts with label vegetable. Show all posts

Sunday, October 9, 2016

Hobo Soup in the Power Pressure Cooker XL


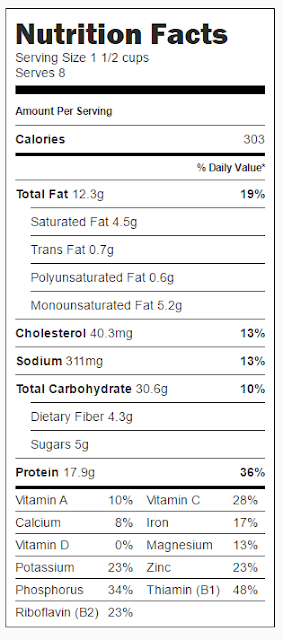
Here is a soup that is quick, easy, delicious and hearty!  This is the perfect fall soup to get on the table fast especially when you are using your pressure cooker!  Today I am sharing this delicious hamburger and macaroni soup that is chock full of veggies and a rich broth and hamburger that I happened to get on markdown from over $12 to under $3 for a pound of 90% lean burger meat!  Thinking outside the box a little I decided to make this delicious soup.

I am also testing and sharing my opinion with you all about the ever popular Power Pressure Cooker XL.  I have to say, I have seen this all over the TV, the internet and on home shopping television.  You may not know this, but I happen to love the infomercial.  If it is all about a kitchen item I am even more interested.  I want to know if these things actually do everything they say they do or if they fall short.  I can assure you that after trying out this particular machine, it lives up to all the talk!

I browned off the hamburger right in the PC on the chicken and meat setting.  Then I added in all of my veggies, broth and macaroni.  Gave everything a stir and popped the lid on making sure the valve was set to pressure.  I reset the machine to soup and stew and cooked for the default time of ten minutes.  I did a quick release so that the macaroni didn't over cook and I have to tell you this turned out perfect!

I think the next time I make this I will toss in a can of kidney or pinto beans for a great addition to this already hearty soup.  You could also add in cubed potatoes, too if you like.  This really reminded me of a bit of minestroni soup.  You can do what you like!  It's going to be great!


The Power Pressure Cooker XL arrived at my home a little over a month ago and I have cooked in it several times.  Many of the things I have shared with you in the past, pork tenderloin, soup, stew, meatballs, rice, hard cooked eggs, and more.  I have had a great experience with this and I really love this six quart size because the other PC I have, while I LOVE it, it is really large at 10 quarts and when I want to make a small batch of rice or wheat berries, a smaller unit is perfect.  This is super easy and user friendly.  I did not worry about that ever feared explosion that many people think of when they use a pressure cooker.  This is virtually fool proof.  I really believe that every busy home cook should have one of these appliances in their arsenal to make life just a little easier!


I would like to thank the good people at Tristar Products and Fusion Home Brands for sending this machine to me to use, test and review!  If you are interested in learning more you can find that on their website!  http://bit.ly/2cWRiNM

You can also find the Power Pressure Cooker XL on Amazon: http://amzn.to/2cS1lHn

I hope you will give this simple but delicious hamburger and macaroni soup a try and I hope you love it!

Get a printable version of this recipe on my website here:

You can see how I made this in my YouTube Video:


Noreen's Kitchen
 Pressure Cooker
Hamburger Macaroni Soup

Ingredients

1 pound ground beef
4 cups beef stock
1, 28 ounce can diced tomatoes
2 cups sliced Cremini mushrooms
2 cups mixed frozen vegetable blend
1 cup onion, chopped
1 cup celery, chopped
3 cloves garlic, minced
2 teaspoons Italian seasoning
2 cups elbow macaroni

Step by Step Instructions

NOTE:  I used a Power Pressure Cooker XL, 6 quart, electric pressure cooker to make this recipe in my video.  The settings described are for that make and model of appliance.  If you have a different brand of electric pressure cooker you will want to refer to the manufacturer’s instruction manual to determine settings and cooking times best suited for your particular machine. 

Pre heat the pressure cooker by selecting the “chicken and meat” button and allowing the vessel to come up to temperature for about 5 minutes.

Brown the ground beef until there is no pink left and no water remains in the bottom of the cooking vessel. 

Add in the rest of the ingredients and give everything a good stir.

Place the lid on the pressure cooker being sure that the release valve is set the pressure setting. 

Clear the display by hitting the Warm/Cancel button and select the soups and stews button.  The default time for this selection will be 10 minutes.  At this amount of time the macaroni will be very soft but not mushy.  If you like your macaroni a bit more “aldente” then you should adjust the cooking time to 6 or 8 minutes.

When the pressure cooker beeps and the cooking time has expired, you will want to quick release the pressure.  This will ensure you do not over cook the macaroni.  Do this by turning the pressure valve from pressure to steam release.  I like to place a towel over the steam to avoid a bunch of condensation on my cabinets. 

When all the steam has released and the pressure has come down, only then will the lid unlock.  Open up the pressure cooker and give your soup as stir.  You may want to let this sit for 10 minutes because it is volcano hot!  


Friday, October 7, 2016

Old World Comfort! Slow Cooked Garden Style Pork Ragout Recipe!


Here is a super delicious, quick to put together pork ragout that will make everyone at the table happy!  This has a bit of a Neopolitan flair with all the different and rich flavors that I have incorporated.  It is very "caccitore" tasting, but oh so delicious!  The slow cooker makes easy work of this rich and decadent tasting sauce and you are going to love it!

In the summer, making pasta sauce can be a daunting and hot prospect, but the slow cooker comes to the rescue and I love to employ it during those dog days when the heat tends to get the better of me.  See, I am NOT a summer lover.  In fact, I would love it, if winter could be all year.  But, alas, Mother Nature has other ideas and I must deal.  


A typical "ragout" is a thick sauce that includes meat, veggies and lots of seasonings.  It can be served alone or with pasta, rice, potatoes or noodles.  If you are inclined, this would be great with some homemade egg noodles or spaetzel.  Instead of using a jarred pasta sauce as a base, I built one for myself using a couple 28 ounce cans of good quality crushed tomatoes along with one standard small can of tomato paste.  I added 1, 10 ounce jar of roasted red pepper strips,  and an equal sized jar of pitted and halved, Calamatta olives.  Then I added some green bell pepper, sweet onion, celery, shredded carrots and lots and lots of garlic.  For meatiness I added four Portobello mushroom caps that I diced and then for the real meat of this dish, one package of beautiful pork tenderloin that I cubed like stew beef. 

all the ingredients got tossed into the slow cooker and then I seasoned that bad boy up with some dry spices like roasted garlic powder, onion powder, Italian seasoning, oregano, basil, thyme salt and pepper.  I did not add a ton of salt because the briny olives will add saltiness as well as the final ingredient the Parmesan rind.  This will slow cook and add a deep and delicious flavor that will be mellow but salty to this sauce.  In the end, it did not require further seasoning once it had cooked all day.  It was perfectly delicious.  


If you are not familiar with using a Parmesan rind in your sauce or soup, then this is going to be a real treat.  If you shop at a store where they offer better cheeses and freshly grated Parmagiano Reggiano, they will always have cheese rind off of those giant wheels.  They will want to recoup their cost because those wheels are no laughing matter to the wallet so when you see them, they will usually sell them in a tub filled to the brim.  They are not expensive.  Like I sometimes can get a quart container of Parmesan rinds for less than three dollars.  Take them home vacuum seal or store in a freezer bag and stick them in your freezer for the next time you make a pasta sauce or tomato based soup or even a chicken soup.  You will love what it does for the flavor.  When the dish is ready to eat, simply fish out the rind and discard.  It has given you all it has to offer and you won't want to eat that.  

My pork ragout cooked on high in my slow cooker for six hours.  The meat was fork tender and fall apart, delicious.  Everything married amazingly well and the four of us enjoyed this sauce over chunky rigatoni pasta that evening for supper,  I also filled a two quart container for the freezer and that is in the slow cooker again, as of this writing a few weeks later getting ready for an easy, freezer banked dinner for a busy night of meetings.  I also had another quart which fed Rick and I for lunch a few days after I initially made this meal.

I hope you give this slow cooked, garden style pork ragout a try and I hope you love it!

Happy Eating!

You can find the recipe on my website:


You can see how I made this in my YouTube Video


Noreen's Kitchen
 Slow Cooked Garden Style
Pork Ragout

Ingredients

2-3 pound pork tenderloin, cubed
3-4 Portobello mushroom caps, diced
1 medium sweet onion, diced
2 stalks celery, chopped
2 carrots, grated
1 medium green bell pepper, chopped
4-6 cloves garlic, minced
1, 10 ounce jar Calamatta olives, drained
1, 10 ounce jar, red pepper strips, drained
2, 28 ounce cans, crushed tomatoes
1, 6 ounce can tomato paste
¼ cup Balsamic vinegar
¼ cup granulated sugar
1 tablespoon roasted garlic powder
1 tablespoon Italian seasoning
1 tablespoon dried oregano
1 tablespoon dried basil
1 teaspoon dried thyme
1 teaspoon salt
1 teaspoon cracked black pepper
3 –4 bay leaves, fresh or dry
1 Parmesan rind, optional

Step by Step Instructions

Add both cans of crushed tomatoes and tomato paste to the crock and stir well to combine. 

Add all remaining ingredients and stir well.

If using the Parmesan rind, tuck it into the center of the crock and sink it in. 

Cover and set on high for 6 to 8 hours on low for 8 to 10 hours.

When meat is fork tender the sauce is done. 

Remove the Parmesan rind and discard.

Taste for seasonings and serve.

This Ragout is delicious served over pasta, rice, mashed or boiled potatoes or egg noodles.  This would even be nice served over hot cooked grains such as wheat berries, qunioa or barley.

Store leftovers in an airtight container in the fridge for up to one week.  In the freezer this can be kept for up to three months.  I like to cook from frozen by tossing the block of frozen sauce right into the slow cooker and setting in on high until it is warmed through.  Then keep warm till ready to serve.  This is a great option for freezer banking when you are getting ready for a busy night! 

Enjoy!


Wednesday, June 15, 2016

Meatless Never Tasted So good! Vegetable Stacks ~ Vegetarian Sheet Pan Dinner!!


Here is a great dinner option for meatless Monday or any day!  Vegetable stacks, vegetarian sheet pan dinner is easy to make and nobody in your family is going to miss the meat!  We really enjoyed this meal and served along with some ancient grains blend that I cooked up in the pressure cooker, this meal was simply delicious!  

We have been wanting to share this for a while and we have had it a couple of times so far this summer and we all really enjoy the simplicity of this meal.  Super simple to make and even the leftovers can be folded into leftover rice, quinoa or couscous for an awesome riff on a tabbouleh salad the next day!


I used some giant portobello mushroom caps from the warehouse store and some thick sliced eggplant, yellow and zuccini squash along with some thick sliced Vidalia onions.  I marinated each veggie in a zip top bag with some of our favorite zesty Italian dressing for 15 to 20 minutes then laid them on a sheet pan lined with a silicone baking mat.  

We baked off the veggies for 20 to 25 minutes until they reached our desired doneness and then created our vegetable stacks on top of the prepared quinoa blend that had been prepared pilaf style.


You can always change up the dressing/marinade and make this with a delicious teriyaki or Asian sesame dressing, or Greek, French or even just some oil and balsamic vinegar would be great!  You decide which direction to take.  No matter what you choose I know it will be delicious!

I hope you give this vegetarian sheet pan dinner a try and I hope you love these vegetable stacks!

Happy Eating!

You can get a printable version of the recipe here:  http://bit.ly/1UwjWb2


You can see how I did this in my YouTube video:


Noreen's Kitchen

Vegetable Stacks
Vegetarian Sheet Pan Dinner


Ingredients
4 portobello mushroom caps
2 medium sized eggplant
2 large sweet onions
2 zucchini
2 yellow squash
2 cups marinade or dressing of choice
salt and pepper to taste

Step by Step Instructions

Preheat oven to 375 degrees.
Clean the gills from the portobello mushrooms and set aside.
Slice eggplant, and squash into 1/2 inch slices.
Slice onion in 1/2 thick slices and place on skewers to make turning easier.  I put two slices per skewer.
Place 1/2 cup of dressing or marinade into a zip top bag and add the mushroom caps.  Seal the bag and distribute the dressing to coat the mushrooms.  Set aside for 15 t0 20 minutes.
Do the same with the rest of the vegetables and allow them to marinate for at least 15 minutes.
Lay the vegetables in a single layer on two sheet pans that you have lined with either foil or silicone mats.
Bake for 20 to 25 minutes or until the vegetables reach your preferred doneness. 
Remove from oven and allow to sit for five minutes before preparing the stacks.
Build stacks by arranging a bed of quinoa, rice or couscous on the bottom of the plate and stacking a mushroom cap on the bottom then squash, onion and topping of with a slice of eggplant.
You can sprinkle with parsley or drizzle with more dressing or marinade if desired before serving.

This is a dish best eaten fresh, however leftover roasted vegetable can be chopped and mixed with any of your leftover rice, quinoa or couscous to make a version of tabbouleh salad that you can eat as a lunch the next day.